Amp up your car’s audio game with expert for optimal bass, midrange, and treble response. From resonance correction to harmonic restoration, discover the best settings for a crystal-clear sound.
Bass Optimization
When it comes to optimizing your car’s sound system for , there are a few key considerations to keep in mind. Tuning for Deep Notes plays a crucial role in ensuring that your subs are producing the rumble and vibration that you’re looking for. This is often accomplished through the use of a bass boost filter, which amplifies the lower frequency range of your music. However, it’s important to do so with caution, as over-emphasis on the low end can lead to a lack of clarity in the mids and highs.
To avoid this issue, Resonance Correction is a vital step in the process. By adjusting the resonance frequency of your subs, you can ensure that they’re producing a smooth, consistent sound that’s not accentuating any particular frequency range. This is often achieved through the use of a parametric EQ, which allows for precise control over the frequency response of your speakers.
By combining these two approaches, you can create a bass response that’s both powerful and controlled, adding depth and dimension to your music without overwhelming the rest of the soundstage. Whether you’re a basshead or just looking to improve the overall sound quality of your car’s audio system, the quest for optimal bass reproduction is a worthwhile one.
Midrange Precision
When it comes to achieving midrange precision, two crucial tasks come into play: clearing up muddiness and vocal enhancement. But what do these terms even mean? Let’s break it down. Muddiness in audio refers to a lack of clarity and definition in the midrange frequencies, often leaving vocals and instruments sounding indistinct. It’s like trying to have a conversation in a crowded restaurant – everyone’s talking, but nobody’s really heard. Vocal enhancement, on the other hand, is all about bringing out the warm, rich tones that make your favorite artists’ voices shine. Put simply, it’s the secret sauce that makes your music sound like, well, music.

Clearing Up Muddiness
So, how do we tackle muddiness? The first step is to identify the frequencies causing the problem. A quick EQ sweep can help isolate the troublemakers. Are there harsh, boxy tones in the 500-700 Hz range? Are there nasal, sibilant resonances in the 1-2 kHz range? Once you’ve identified the culprits, you can start making targeted adjustments. Cut those frequencies back, and watch as the midrange opens up and your mix starts to breathe. It’s amazing how a little precision can make all the difference.
Vocal Enhancement
Now that we’ve cleared up the muddiness, it’s time to add some magic to those vocals. Here’s the thing: when you’re dealing with a strong, clear vocal performance, a little EQ goes a long way. Boosting around 1-2 kHz can add a touch of brightness and clarity, enhancing the singer’s natural tone. Meanwhile, a gentle cut around 200-300 Hz can help eliminate any boxy or muffled resonance. And for good measure, a subtle boost in the 5-7 kHz range can add a hint of shimmer and airiness. The result? A vocal performance that’s both believable and captivating – like your favorite singer’s voice, minus the bad habits.
Treble Balance
In the world of audio, treble balance is a crucial aspect to consider. It’s the high-frequency range of sound that gives your music that crisp, detailed quality. Think of it like the icing on the cake – it adds the finishing touches to the overall sound. But how do you achieve that perfect treble balance?
High-Frequency Clarity
High-frequency clarity is the key to unlocking a treble balance that’s both pleasing to the ear and technically accurate. This is where the magic happens, and your music is transformed from bland to grand. But what exactly does high-frequency clarity entail? Put simply, it’s the ability to hear even the smallest details, from the highest highs to the lowest lows. Imagine being able to pick out individual notes in a symphony orchestra – that’s the kind of clarity we’re talking about.
Harmonic Restoration
Harmonic restoration is the process of taking those delicate high-frequency details and polishing them until they shine like diamonds. It’s like taking a beautiful piece of jewelry and giving it a gentle cleaning to bring out its true beauty. This process involves carefully amplifying or attenuating the harmonics (the subtle overtones that give music its depth and richness) to achieve a breathtaking sense of clarity and presence. The result is music that’s not only beautifully detailed but also incredibly engaging and immersive.
Equalizer Types
When it comes to sound equalization, choosing the right type of equalizer can be a crucial step in achieving optimal audio quality. In this section, we’ll delve into two of the most common types of equalizers: Parametric EQ and Graphic EQ.
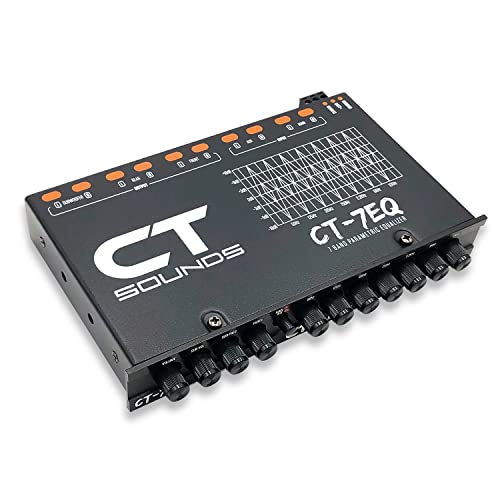
Parametric EQ
A Parametric EQ is a powerful tool that allows you to make precise adjustments to your audio signal. Unlike a Graphic EQ, which operates on a frequency-specific basis, a Parametric EQ allows you to target a specific frequency range and shape the tone to your liking. Imagine having a pair of finely-tuned scissors at your disposal, allowing you to carefully trim and shape the sound waves to perfection.
With a Parametric EQ, you can adjust the following parameters:
- Frequency: The specific range of frequencies you want to target
- Bandwidth: The width of the frequency range you’re working on
- Gain: The amount of amplification or reduction you’re applying to the signal
This level of precision makes Parametric EQs ideal for fine-tuning specific aspects of a sound, such as correcting resonance issues or adding warmth to a vocal.
Graphic EQ
A Graphic EQ, on the other hand, is a more straightforward approach to equalization. Imagine a visual representation of the frequency spectrum, with a series of sliders or knobs allowing you to boost or cut specific frequency ranges. This graphical interface makes it easy to visualize and adjust the tone of your audio, making Graphic EQs a popular choice for live sound applications and general tone enhancement.

With a Graphic EQ, you can make broad, sweeping adjustments to the tone, such as boosting the bass or cutting the treble. This makes them ideal for making quick and easy adjustments to a sound, without getting bogged down in detailed frequency analysis.
Whether you’re a seasoned audio engineer or just starting out, understanding the differences between Parametric and Graphic EQs can help you make informed decisions about which type to use in different situations. By combining the strengths of both, you’ll be well on your way to unlocking the full potential of your audio equipment.
Car Audio Considerations
When it comes to optimizing your car audio system, there are two major culprits that can ruin the listening experience: vehicle echo cancellation and road noise reduction. Think of it like trying to enjoy a quiet conversation in a bustling coffee shop – the constant interruptions from the background noise and echo can make it difficult to focus on what’s important.
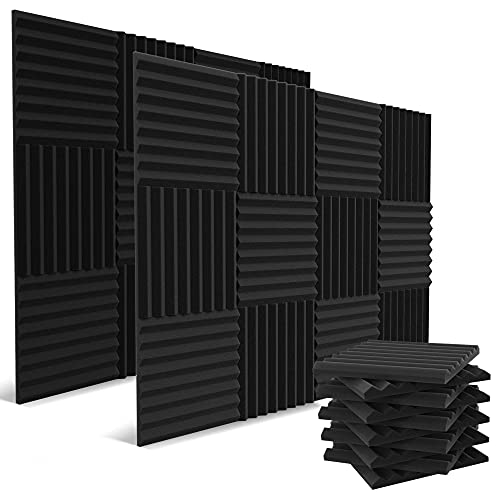
Vehicle Echo Cancellation
Have you ever been in a car where the words of the person speaking seem to bounce off the windows and doors, creating an unpleasant echo? This is because of something called resonance, where sound waves resonate at certain frequencies and amplify them. To combat this, you’ll want to implement vehicle echo cancellation techniques. One common method is to place acoustic panels, like absorption pads, on the ceiling and walls of the vehicle. These panels absorb sound waves, reducing the echo and providing a more immersive listening experience.
Road Noise Reduction
Road noise is a major challenge when it comes to car audio. It’s like trying to have a conversation in a noisy restaurant – you can barely hear what the other person is saying. Road noise reduction techniques aim to minimize the rumble of the engine, tires, and road irregularities. One effective method is to use sound-dampening materials, like Dynamat, to absorb sound waves and reduce vibrations. You can also use noise-reducing alloys, like aluminum or magnesium, for parts like the exhaust system. Another approach is to adjust the suspension and tire pressure to reduce road irregularities.

Remember, both vehicle echo cancellation and road noise reduction are crucial steps in optimizing your system. By addressing these issues, you’ll be able to enjoy your music with clarity and precision, making every drive a memorable one.
Equalizer Methods
===============
When it comes to using an equalizer to fine-tune your sound, there are several methods to explore. In this section, we’ll delve into two primary approaches: Boosting and Cutting, as well as Phasing and Notching.
Boosting and Cutting
Boosting and cutting are the most common equalizer techniques. Boosting refers to increasing the volume of a specific frequency range, while cutting involves reducing it.Think of it like adjusting the tone controls on your car stereo. When you boost a frequency, you’re amplifying the sound, making it stronger and more pronounced. Cutting, on the other hand, softens the sound, making it less dominant in the overall mix.
Boosting can be used to add depth and character to your sound, while cutting helps to correct unwanted frequencies that clash with the rest of the audio. For instance, if your voice sounds too boomy, you might need to cut some of the low-end frequencies to bring it back into balance. Conversely, if your music lacks punch, you could boost the low-end to give it more energy.
Here’s a table to help you visualize the boosting and cutting process:
| Frequency Range | Boost | Cut |
|---|---|---|
| Bass | Boost | Cut |
| Treble | Boost | Cut |
| Midrange | Cut | Boost |
Phasing and Notching
Phasing and notching are more advanced equalizer techniques that aim to refine the sound even further. Phasing involves creating a subtle notch or dip in the frequency response, allowing you to carve out specific frequencies and create a sense of space or ambiance.
Notching, on the other hand, involves creating a peak or boost in the frequency response, which can add texture and interest to the sound. Think of it like adding a subtle layer of reverb or ambiance to the mix.
Phasing and notching require a more nuanced approach, as they involve subtle adjustments to the frequency response. However, when used correctly, they can add incredible depth and complexity to your sound.
In the next section, we’ll explore the different types of equalizers and how they can be used to achieve the desired sound.
