Looking for the best budget studio monitors? Learn about , under $200, and troubleshooting tips for optimal sound quality and studio setup.
Factors to Consider When Choosing Budget Studio Monitors
Sound Quality
When it comes to choosing budget studio monitors, sound quality should be at the top of your list. After all, the whole purpose of these monitors is to accurately reproduce the sound of your recordings. Look for monitors that offer a balanced and transparent sound, allowing you to hear every detail in your mix. Consider the frequency response, which we’ll discuss next, as it plays a crucial role in determining the overall sound quality.
Frequency Response
The frequency response of a studio monitor refers to the range of frequencies it can reproduce. It is typically represented in Hertz (Hz) and is often displayed as a graph indicating the monitor’s response across the frequency spectrum. Ideally, you want a monitor with a flat frequency response, meaning it reproduces all frequencies equally. This ensures that you can accurately hear the full range of your recordings, from deep bass to crisp highs. Some monitors may have a slight boost in certain frequency ranges, which can be a matter of personal preference or cater to specific music genres.
Power Output
The power output of studio monitors is an important consideration, especially if you plan on using them in a larger studio or for mixing at higher volumes. The power output is usually measured in watts and determines how loud the monitors can get without distorting the sound. It’s essential to match the power output of the monitors to the size of your studio space and the sound pressure level you desire. Keep in mind that higher power output doesn’t necessarily mean better sound quality, but it can provide more headroom and prevent distortion at higher volumes.
Connectivity Options
When choosing budget studio monitors, it’s important to consider the connectivity options they offer. Most monitors come with standard analog inputs, such as XLR, TRS, or RCA, allowing you to connect them to your audio interface or mixer. However, some monitors also offer digital inputs, such as USB or SPDIF, which can be convenient if you work with digital audio sources. Additionally, consider if the monitors have any built-in controls or adjustments, like volume knobs or EQ settings, to cater to your specific needs.

In summary, when choosing budget studio monitors, prioritize sound quality above all else. Look for monitors with a balanced and transparent sound, ensuring every detail in your mix is accurately reproduced. Consider the frequency response to ensure the full range of frequencies is faithfully represented. Assess the power output to match the monitors to your studio size and desired sound pressure level. Finally, check the connectivity options to ensure compatibility with your audio setup. By considering these factors, you can make an informed decision and find the perfect budget studio monitors for your needs.
Top Budget Studio Monitors Under $200
When it comes to choosing budget studio monitors, there are several . One of the most important aspects is the . After all, you want your monitors to accurately reproduce the audio you are working with. Another crucial factor is the frequency response, which determines the range of frequencies that the monitors can reproduce. Additionally, the power output of the monitors is essential as it determines the volume and clarity of the sound. Lastly, considering the connectivity options is vital to ensure that the monitors can be easily connected to your audio interface or other devices.
Now, let’s dive into the top budget studio monitors under $200 that you should consider:
JBL Professional 305P MkII
The JBL Professional 305P MkII is an excellent choice for those on a budget. These monitors offer exceptional , with a frequency response range of 43Hz to 24kHz. This wide frequency response ensures that you can hear every detail in your audio recordings. With a power output of 82 watts, these monitors can deliver a loud and clear sound, perfect for small studio setups. In terms of connectivity, they feature balanced XLR and 1/4-inch TRS inputs, allowing you to connect them to a variety of audio devices.
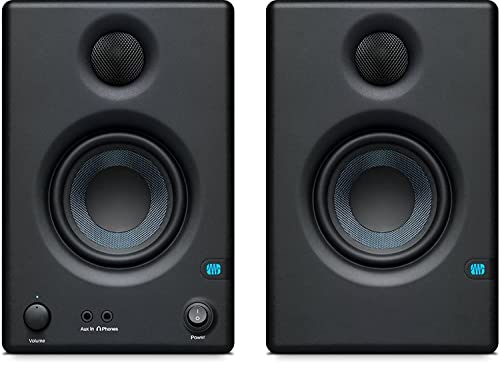
PreSonus Eris E3.5-3.5″ Near Field Studio Monitor
Another top contender in the budget studio monitor category is the PreSonus Eris E3.5. These compact monitors pack a punch when it comes to sound quality. With a frequency response range of 80Hz to 20kHz, they offer a balanced and accurate representation of your audio. The power output of 25 watts per speaker ensures that you can achieve sufficient volume levels without distortion. These monitors also provide a variety of connectivity options, including balanced 1/4-inch TRS, unbalanced RCA, and 1/8-inch stereo inputs.

Mackie CR-X Series CR3-X 3″ Creative Reference Multimedia Monitors
If you are looking for a budget-friendly option without compromising on quality, the Mackie CR3-X monitors are worth considering. Despite their small size, these monitors deliver impressive sound quality. With a frequency response range of 80Hz to 20kHz, they cover a wide spectrum of frequencies, allowing you to hear the nuances in your audio recordings. The power output of 50 watts per speaker provides ample volume for most studio setups. In terms of connectivity, the Mackie CR3-X monitors offer options such as balanced 1/4-inch TRS, unbalanced RCA, and 1/8-inch stereo inputs.
Now that we have covered the top budget studio monitors, let’s move on to some tips for setting them up effectively.
Tips for Setting Up Budget Studio Monitors
Setting up your budget studio monitors properly is crucial to ensure optimal sound reproduction. Here are some tips to help you get the most out of your monitors:
Placement and Positioning
The placement and positioning of your studio monitors can significantly impact the sound quality. It is recommended to position the monitors at ear level and form an equilateral triangle with your listening position. This setup ensures a balanced stereo image and minimizes phase cancellation. Additionally, consider placing the monitors away from walls and corners to reduce unwanted reflections and bass buildup.
Room Acoustics
The acoustics of your room can greatly influence the sound quality of your monitors. Consider acoustic treatment options such as bass traps, diffusers, and acoustic panels to minimize reflections and improve the overall balance of the sound. Experimenting with different placements and treatments can help you achieve a more accurate and balanced listening environment.
Calibration and Testing
Calibrating your budget studio monitors is essential to ensure accurate sound reproduction. Utilize calibration tools such as room correction software or audio measurement systems to analyze the frequency response and adjust the monitors accordingly. Regularly test your monitors using reference tracks to ensure they are reproducing audio accurately and identify any potential issues.
By following these tips, you can optimize the performance of your budget studio monitors and create a more accurate and enjoyable listening experience.
Now, let’s address some common issues that you may encounter with budget studio monitors and how to troubleshoot them.
Troubleshooting Common Issues with Budget Studio Monitors
While budget studio monitors can provide excellent value for your money, they are not immune to certain issues. Here are some common problems you may encounter and how to troubleshoot them effectively:
Distorted Sound
If you experience distorted sound coming from your studio monitors, it could be due to various factors. First, check the input levels and ensure they are not set too high, causing clipping or distortion. Additionally, examine the positioning of the monitors and make sure they are not placed too close to walls or corners, as this can result in bass buildup and muddiness. Lastly, inspect the audio cables for any loose connections or damage that may affect the signal quality.

No Sound or Low Volume
If you are not hearing any sound or experiencing low volume from your studio monitors, start by checking the connections. Ensure that the audio cables are securely plugged into both the monitors and the audio source. If using balanced connections, confirm that the positive and negative terminals are correctly connected. Additionally, inspect the volume controls on your monitors and the audio source to ensure they are set at an appropriate level.
Connectivity Problems
Sometimes, you may encounter connectivity issues with your budget studio monitors. If you are unable to establish a connection, double-check the cables and ensure they are compatible with your audio interface or other devices. Test different cables if necessary. If using multiple input options, verify that the correct input source is selected on your monitors. If the problem persists, try connecting the monitors to a different audio source to determine if the issue lies with the source or the monitors themselves.
Overall, choosing the right budget studio monitors, setting them up correctly, and troubleshooting any potential issues are key steps in creating an optimal studio environment. By considering the factors mentioned earlier and following the tips provided, you can enhance your audio production experience without breaking the bank. So, invest in a pair of budget studio monitors that suit your needs, set them up thoughtfully, and get ready to create amazing music or multimedia content with confidence.
Tips for Setting Up Budget Studio Monitors
When it comes to setting up your budget studio monitors, there are a few important . Proper placement and positioning, understanding room acoustics, and calibration and testing are all crucial for achieving optimal sound quality. In this section, we will dive into each of these aspects to help you get the most out of your budget studio monitors.
Placement and Positioning
The placement and positioning of your budget studio monitors can greatly impact the overall sound quality and listening experience. Here are some tips to ensure you position your monitors correctly:

- Keep them at ear level: Position your studio monitors at ear level to ensure that the sound is directed towards your ears. This will help you hear a more accurate representation of the audio you are producing.
- Maintain the proper distance: Place your monitors at an equal distance from each other and from your listening position. The ideal positioning is to form an equilateral triangle between the two monitors and your listening position. This helps create a balanced stereo image and prevents any phase cancellation issues.
- Isolation pads: Consider using isolation pads or stands to decouple your monitors from the surface they are placed on. This helps reduce vibrations and prevents any unwanted resonances, resulting in a cleaner sound.
- Avoid reflective surfaces: Try to position your studio monitors away from reflective surfaces such as glass windows or bare walls. These surfaces can cause unwanted reflections and affect the accuracy of the sound you hear.
Room Acoustics
Understanding the acoustics of your room is essential for achieving accurate sound reproduction. Here are some tips to optimize your room acoustics:
- Treat your room: Consider adding acoustic treatment to your room to minimize unwanted reflections and echoes. This can be done using diffusers, absorbers, bass traps, and acoustic panels. By controlling the reflections, you can achieve a more accurate representation of the audio.
- Bass management: Bass frequencies can be particularly challenging in small rooms. To achieve a more balanced bass response, experiment with speaker placement and consider using bass traps in the corners of your room. This helps reduce any standing waves or bass build-up.
- Speaker positioning: Depending on the layout of your room, you may need to experiment with different speaker positions to find the best sound. Avoid placing your monitors too close to walls or corners, as this can result in boomy or muddy bass.
- Consider room size: Keep in mind that the size of your room can influence the overall sound. Smaller rooms tend to have more prominent reflections and can create a less accurate listening environment. If possible, choose a room with dimensions that are not perfectly symmetrical to minimize any standing waves.
Calibration and Testing
Calibrating and testing your budget studio monitors is crucial to ensure accurate sound reproduction. Here are some tips to help you calibrate and test your monitors effectively:
- Use reference tracks: Select a few reference tracks that you are familiar with and that cover a wide range of frequencies. These tracks will serve as a benchmark for evaluating the accuracy of your monitors. Listen to them on different systems and take note of any differences.
- Check frequency response: Use an audio measurement tool or software to analyze the frequency response of your monitors. This will help you identify any peaks or dips in certain frequency ranges. Adjust the positioning or use EQ settings to compensate for any irregularities.
- Listen at different volumes: Test your monitors at various volume levels to ensure that they can handle different dynamic ranges. Pay attention to any distortion or compression at higher volumes, as this can indicate limitations in the power handling of your monitors.
- Consider room correction software: If you are struggling with room acoustics, consider using room correction software. These tools analyze the acoustics of your room and apply digital filters to compensate for any issues. However, keep in mind that room correction should be used as a supplement, not a substitute for proper acoustic treatment.
Setting up your budget studio monitors can be a rewarding process that greatly improves your audio production experience. By following these tips for proper placement and positioning, understanding room acoustics, and calibrating and testing your monitors, you can achieve a more accurate and enjoyable listening environment. Remember, the goal is to create a space where you can trust the sound coming from your monitors and make informed decisions when it comes to your audio production.
Troubleshooting Common Issues with Budget Studio Monitors
Distorted Sound
One of the most frustrating issues you may encounter when using budget studio monitors is distorted sound. This can greatly affect the quality of your audio and make it difficult to accurately assess your recordings. Fortunately, there are a few common causes for distorted sound and some simple solutions you can try.
Firstly, check the volume levels on your audio source. If the volume is set too high, it can cause the signal to overload and distort. Try lowering the volume and see if the distortion disappears. Additionally, make sure that the input gain on your monitors is not set too high. Adjusting the input gain can help prevent distortion by ensuring that the signal is at an appropriate level for your monitors.
Another possible cause of distorted sound is interference from other electronic devices. Keep your studio monitors away from sources of electromagnetic interference, such as Wi-Fi routers or cell phones. These devices can introduce unwanted noise into your audio signal, resulting in distortion. Moving your monitors away from these sources of interference can help improve .
Lastly, consider the positioning of your monitors. Placing them too close to walls or corners can cause sound reflections and resonance, leading to distorted audio. Experiment with different options and try using acoustic treatment, such as foam panels, to minimize reflections and improve sound quality.
No Sound or Low Volume
If you’re experiencing no sound or low volume from your budget studio monitors, there are a few troubleshooting steps you can take to resolve the issue.
Firstly, check the connections between your audio source and the monitors. Ensure that all cables are securely plugged in and that there are no loose connections. Sometimes, a simple cable adjustment can fix the problem.
Next, check the volume settings on both your audio source and the monitors. Make sure that the volume is turned up and not muted. Additionally, check if there are any dedicated volume controls on the monitors themselves and ensure they are set to an appropriate level.
If you’re still not getting any sound or the volume is too low, try connecting your audio source to a different set of speakers or headphones. This will help determine if the issue lies with the monitors or the audio source itself. If you get sound from other speakers or headphones, it suggests that the problem is with the monitors and you may need to contact customer support or consider getting them repaired.
Lastly, consider checking the audio settings on your computer or audio interface. Make sure that the correct audio output device is selected and that the volume levels are appropriately set. Sometimes, software settings can affect the sound output, so it’s worth double-checking these settings as well.
Connectivity Problems
Connectivity problems can be a common issue when using budget studio monitors, but they can usually be resolved with a few simple steps.
Firstly, check the cables and connectors you are using to connect your audio source to the monitors. Ensure that all cables are securely plugged in and that there are no loose connections. If you’re using any adapters or converters, make sure they are compatible with your equipment.
If you’re using an audio interface or external sound card, ensure that it is properly connected to your computer and that all drivers are up to date. Outdated or incompatible drivers can cause connectivity issues.
Another potential cause of connectivity problems is a faulty audio source or monitor. Try connecting a different audio source or using a different set of monitors to determine if the issue lies with the equipment. If the problem persists with different equipment, it may indicate a problem with your audio interface or computer.
If you’re using wireless connectivity, such as Bluetooth, make sure that both your audio source and monitors are paired correctly. Check the user manuals for both devices for specific instructions on pairing.
In some cases, interference from other wireless devices can cause connectivity issues. Keep your monitors away from other devices that may use the same frequency range, such as Wi-Fi routers or cordless phones. Moving your monitors to a different location or adjusting their position can help minimize interference.
In conclusion, troubleshooting common issues with budget studio monitors can be frustrating, but with a few simple steps, you can often resolve these problems yourself. By checking for distorted sound, no sound or low volume, and connectivity problems, you can ensure that your studio monitors are working optimally and provide you with accurate sound reproduction for your recordings. Remember to experiment with different solutions and seek professional help if needed.
