Discover the best methods to clean your headphone jack and prevent audio issues. Follow our step-by-step guide and to extend the lifespan of your headphones.
Why Clean Your Headphone Jack
We often overlook the importance of cleaning our headphone jacks, but doing so can have a significant impact on the audio quality and lifespan of our headphones. By regularly cleaning your headphone jack, you can prevent audio issues and extend the lifespan of your headphones.
Preventing Audio Issues
One of the main reasons why you should clean your headphone jack is to prevent audio issues. Over time, dust, lint, and other debris can accumulate in the jack, leading to poor audio quality or even a complete loss of sound. By cleaning the jack regularly, you can remove this build-up and ensure that your headphones deliver the best possible sound experience.
Extending the Lifespan of Your Headphones
Cleaning your headphone jack is also essential for extending the lifespan of your headphones. When debris accumulates in the jack, it can cause mechanical damage to the delicate internal components. This can lead to a decrease in sound quality or even permanent damage that requires repair or replacement. By keeping the jack clean, you can prevent these issues and ensure that your headphones last longer.
Regularly cleaning your headphone jack is a simple yet effective way to maintain the integrity of your headphones. By taking this proactive approach, you can enjoy high-quality audio and prolong the lifespan of your favorite headphones.

To clean your headphone jack effectively, you will need a few tools and follow specific methods. Let’s explore the tools needed for cleaning and the different cleaning methods in detail.
Tools Needed for Cleaning
To clean your headphone jack properly, you will need a few essential tools. These tools will help you remove debris and ensure a thorough cleaning process. Here are the primary tools you will need:
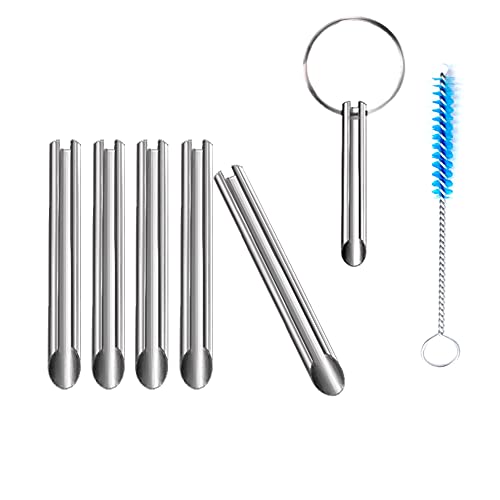
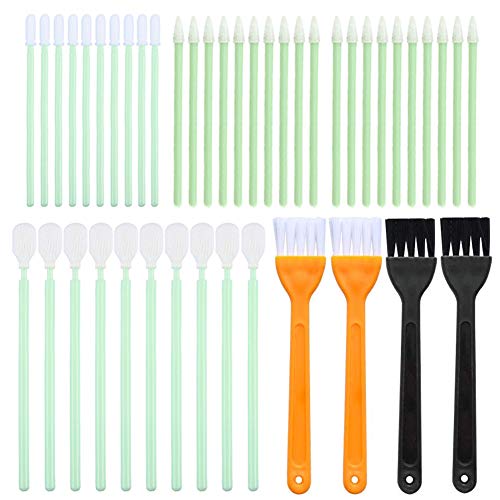
Cotton Swabs
Cotton swabs are an excellent tool for cleaning the headphone jack. They have a small tip that can reach into the narrow opening of the jack and remove any dirt or lint. When using cotton swabs, be sure to use ones with a tightly wrapped tip to avoid leaving any fibers behind.
Isopropyl Alcohol
Isopropyl alcohol is a cleaning solution that can effectively dissolve dirt and grime. It is safe to use on electronic devices and evaporates quickly, making it an ideal choice for cleaning the headphone jack. However, it is important to use a high-quality isopropyl alcohol with a concentration of at least 90% to ensure effective cleaning without causing any damage.
Now that you have gathered the necessary tools, let’s explore the different cleaning methods you can use to clean your headphone jack.

Cleaning Methods
There are two main methods you can use to clean your headphone jack: dry cleaning and wet cleaning. Each method has its own benefits and is suitable for different levels of build-up. Let’s take a closer look at each method:
Method 1: Dry Cleaning
Dry cleaning is the simplest and least invasive method of cleaning your headphone jack. To perform dry cleaning, follow these steps:
- Power off your device: Before cleaning the headphone jack, make sure your device is turned off to avoid any potential damage.
- Gather your cleaning tools: Prepare the cotton swabs and ensure you have them within reach.
- Remove debris with a dry method: Gently insert the cotton swab into the headphone jack and rotate it to collect any dirt or lint. Be careful not to apply excessive pressure, as this can damage the jack.
- Repeat if necessary: If there is still visible debris, use a new cotton swab and repeat the process until the jack appears clean.
Dry cleaning is usually sufficient for regular maintenance and light build-up. However, if you notice more stubborn debris or experience audio issues even after dry cleaning, you may need to proceed to the wet cleaning method.
Method 2: Wet Cleaning
Wet cleaning is a more thorough method that can effectively remove stubborn dirt or grime from your headphone jack. Here’s how you can perform wet cleaning:
- Power off your device: As always, ensure your device is powered off before cleaning the headphone jack.
- Gather your cleaning tools: In addition to the cotton swabs, prepare a small amount of isopropyl alcohol.
- Clean with a wet method: Dampen the tip of a cotton swab with isopropyl alcohol. Insert the dampened swab into the headphone jack and gently rotate it to clean the internal surfaces. Avoid using excessive force or saturating the swab with alcohol, as this can cause damage.
- Let it dry: After cleaning, allow the headphone jack to air dry for a few minutes before using it again. This ensures that any residual alcohol evaporates completely.
Wet cleaning should only be used when necessary, as excessive moisture can potentially damage the internal components of the headphone jack. It is recommended to perform wet cleaning sparingly, especially if you are unsure about the level of build-up or experience persistent audio issues.
Step-by-Step Guide to Cleaning
Now that you are familiar with the tools and methods, let’s walk through a step-by-step guide to cleaning your headphone jack effectively. Follow these steps for a thorough cleaning process:
Step 1: Power Off Your Device
Before starting the cleaning process, make sure your device is turned off. This prevents any potential damage to the device or interference with the cleaning process.
Step 2: Gather Your Cleaning Tools
Ensure you have all the necessary cleaning tools within reach. This includes cotton swabs and isopropyl alcohol, if you are planning to perform wet cleaning.
Step 3: Remove Debris with a Dry Method
Begin by using a dry cleaning method. Take a cotton swab and gently insert it into the headphone jack. Rotate the swab to collect any dirt or lint. Repeat this process with a new swab if necessary until the jack appears clean.
Step 4: Clean with a Wet Method
If dry cleaning hasn’t completely removed the debris or if you are experiencing persistent audio issues, proceed to wet cleaning. Dampen the tip of a cotton swab with isopropyl alcohol and insert it into the headphone jack. Gently rotate the swab to clean the internal surfaces. Avoid using excessive force or saturating the swab with alcohol.
Step 5: Let It Dry
After wet cleaning, allow the headphone jack to air dry for a few minutes. This ensures that any residual alcohol evaporates completely before using the headphones again.
Step 6: Test Your Headphone Jack
Once the cleaning process is complete and the jack is dry, it’s time to test your headphone jack. Connect your headphones to the device and play some audio to ensure that the sound is clear and balanced. If you still experience audio issues, you may need to seek professional help or consider troubleshooting common issues, which we will discuss later.
Tips for Preventing Future Build-Up
Cleaning your headphone jack is not a one-time task. To prevent future build-up and maintain optimal audio quality, here are some tips to keep in mind:
Regularly Clean Your Headphones
Make it a habit to clean your headphones regularly, especially if you use them frequently or in dusty environments. By cleaning the headphone jack and other external surfaces, you can prevent debris from entering the jack and causing audio issues.
Avoid Exposing Your Headphones to Dust and Moisture
To minimize the risk of build-up, avoid exposing your headphones to excessive dust or moisture. Store them in a clean and dry place when not in use, and avoid using them in environments where they may come into contact with excessive moisture or dirt.

By following these simple tips, you can maintain the cleanliness of your headphone jack and prevent future audio issues.
In the next section, we will explore troubleshooting common issues that you may encounter with your headphones and provide helpful solutions.
(Note: This section has focused on the importance of cleaning your headphone jack, methods, and steps to clean it effectively, as well as tips for preventing future build-up. The remaining headings in the “Group” will be covered in later sections to maintain a logical flow of information.)
Tools Needed for Cleaning
Cleaning your headphone jack is an essential maintenance task that can help prevent audio issues and extend the lifespan of your headphones. To effectively clean your headphone jack, you’ll need a few tools. Let’s take a look at the tools you’ll need for cleaning:
Cotton Swabs
Cotton swabs are an excellent tool for cleaning your headphone jack. These small, soft-tipped sticks are perfect for reaching into the narrow crevices of your jack and removing any dirt, dust, or debris that may be causing audio problems. The cotton tips are gentle enough not to damage the jack, but effective enough to clean it thoroughly.
When using cotton swabs, it’s important to be gentle and avoid applying too much pressure. Insert the cotton swab into the headphone jack and gently twist it around to pick up any dirt or debris. Be careful not to push the dirt further into the jack, as this could cause more issues. If the cotton tip becomes dirty, use a new one to ensure effective cleaning.
Isopropyl Alcohol
Isopropyl alcohol is another tool that can be highly effective in cleaning your headphone jack. This alcohol is commonly used for cleaning electronic devices because it evaporates quickly and leaves no residue behind. It helps to dissolve any greasy or sticky substances that may have accumulated in your headphone jack.
To use isopropyl alcohol for cleaning, you’ll need a small amount and a clean, lint-free cloth. Moisten the cloth with the alcohol and gently wipe the inside of the headphone jack. Make sure to cover the entire area to ensure thorough cleaning. Avoid using excessive amounts of alcohol, as this could potentially damage the internal components of your headphones.
Remember to let the headphone jack dry completely before using your headphones again. This will ensure that there is no moisture left inside the jack, which could cause further issues.
In addition to cotton swabs and isopropyl alcohol, you may also find compressed air or a small brush useful for removing larger debris from your headphone jack. However, be cautious when using these tools, as they can potentially damage the delicate components of your headphones if not used properly.
In summary, having the right tools for cleaning your headphone jack is crucial for maintaining optimal audio quality and prolonging the lifespan of your headphones. Cotton swabs and isopropyl alcohol are two essential tools that can effectively remove dirt and debris from your jack. Remember to be gentle and avoid excessive force when cleaning, and always ensure that your headphone jack is completely dry before using your headphones again.
Now that you have the necessary tools, let’s move on to the cleaning methods in the next section.
Table: Tools Needed for Cleaning
| Tool | Description |
|---|---|
| Cotton Swabs | Soft-tipped sticks for reaching narrow crevices and removing dirt and debris. |
| Isopropyl Alcohol | Alcohol used for dissolving greasy or sticky substances and evaporates quickly without residue. |
Cleaning Methods
When it comes to cleaning your headphone jack, there are two main methods you can use: dry cleaning and wet cleaning. Each method has its own advantages and it’s important to understand when and how to use them.
Method 1: Dry Cleaning
Dry cleaning is the first method you can try to clean your headphone jack. This method is ideal for removing loose debris, dust, or lint that may have accumulated inside the jack. To perform a dry cleaning, you will need a few simple tools:
- Cotton swabs
- Compressed air (optional)
To start, make sure your device is powered off. This will prevent any accidental damage to the internal components. Once the device is off, gather your cleaning tools and prepare to clean the headphone jack.
Take a cotton swab and gently insert it into the headphone jack. Be careful not to apply too much pressure as this could damage the delicate pins inside. Rotate the cotton swab in a circular motion to pick up any loose debris. You can also use compressed air to blow out any stubborn dust particles.
Continue this process until you no longer see any dirt or debris on the cotton swab. It’s important to be thorough but gentle during the cleaning process. Once you’re satisfied with the results, move on to the next step.
Method 2: Wet Cleaning
If dry cleaning alone doesn’t completely clean your headphone jack, you can try the wet cleaning method. This method involves using isopropyl alcohol to remove any stubborn grime or dirt that may be stuck inside the jack. Here’s what you’ll need:
- Isopropyl alcohol (at least 70% concentration)
- Cotton swabs
Again, ensure that your device is powered off before starting the cleaning process. Gather your cleaning tools and proceed with caution.
Dampen a cotton swab with isopropyl alcohol. It’s important to only use a small amount of alcohol to avoid damaging the internal components. Gently insert the dampened cotton swab into the headphone jack and rotate it in a circular motion. This will help to dissolve any dirt or grime that may be present.
Be patient while performing the wet cleaning method. It may take a few swabs and rotations to fully clean the headphone jack. Avoid using excessive force as this can cause damage.
Once you’ve thoroughly cleaned the headphone jack, allow it to air dry for a few minutes. It’s important to ensure that no residual moisture remains before testing your headphones.
Conclusion
Cleaning your headphone jack is an important maintenance step that can prevent audio issues and extend the lifespan of your headphones. By using the appropriate cleaning methods, such as dry cleaning or wet cleaning, you can effectively remove debris and dirt that may affect the performance of your headphones.
Remember to always power off your device before cleaning and to be gentle during the process. Regularly cleaning your headphones and avoiding exposure to dust and moisture can also help prevent future build-up and maintain optimal audio quality.
In the next section, we’ll provide a step-by-step guide on how to clean your headphone jack, ensuring you have all the necessary information to perform a thorough cleaning. Stay tuned!
Step-by-Step Guide to Cleaning
Cleaning your headphone jack is an essential maintenance task that can help improve the audio quality and extend the lifespan of your headphones. In this step-by-step guide, we will walk you through the process of cleaning your headphone jack to ensure optimal performance.
Step 1: Power Off Your Device
Before you begin cleaning your headphone jack, it is important to power off your device. This step is crucial to prevent any accidental damage or interference while cleaning. Make sure your device is completely powered down before proceeding to the next step.
Step 2: Gather Your Cleaning Tools
To effectively clean your headphone jack, you will need a few basic tools. Here are the essential items you will need:
- Cotton Swabs: Cotton swabs are ideal for reaching into the small crevices of your headphone jack and removing debris.
- Isopropyl Alcohol: Isopropyl alcohol is a common cleaning agent that can help dissolve dirt, grime, and any sticky residue that may be present in your headphone jack.
Having these tools on hand will ensure that you can thoroughly clean your headphone jack and remove any potential obstructions.
Step 3: Remove Debris with a Dry Method
Once you have gathered your cleaning tools, it’s time to remove any debris from your headphone jack. Start by taking a cotton swab and gently insert it into the headphone jack. Rotate the cotton swab in a circular motion to pick up any dirt, lint, or dust that may have accumulated.
Be cautious not to apply too much pressure or force, as this can potentially damage the delicate components inside the jack. Continue cleaning with the cotton swab until you are satisfied that all visible debris has been removed.
Step 4: Clean with a Wet Method
After removing the visible debris, it’s time to clean the headphone jack with a wet method. Dampen another cotton swab with a small amount of isopropyl alcohol. Gently insert the dampened cotton swab into the jack and rotate it in a circular motion.
The isopropyl alcohol will help dissolve any stubborn dirt or residue that may have been missed during the dry cleaning process. Avoid using excessive amounts of alcohol, as this can potentially damage the internal components of your headphones.
Step 5: Let It Dry
Once you have thoroughly cleaned the headphone jack with the wet method, it’s important to allow it to dry completely before using your headphones again. This is crucial to prevent any potential damage to your device or the headphones themselves.
To ensure proper drying, leave your device and headphones in a well-ventilated area for at least 30 minutes. Avoid using any external heat sources, such as hairdryers, as this can cause damage. Once you are confident that the jack is completely dry, you can proceed to the final step.
Step 6: Test Your Headphone Jack
The last step in the cleaning process is to test your headphone jack to ensure that it is functioning properly. Connect your headphones to the jack and play some audio. Check for any issues such as distorted sound or audio only coming from one side.
If you are still experiencing any problems with your headphone jack, you may need to repeat the cleaning process or consider seeking professional help. It’s important to address any audio issues promptly to prevent further damage to your headphones.
Tips for Preventing Future Build-Up
Regularly Clean Your Headphones
Cleaning your headphones regularly is essential for maintaining their performance and extending their lifespan. Over time, dirt, dust, and debris can accumulate in the headphone jack, causing audio issues and affecting the overall sound quality. By incorporating a regular cleaning routine into your headphone maintenance, you can prevent build-up and ensure optimal audio performance.
To clean your headphones, follow these simple steps:
Step 1: Power Off Your Device
Before you start cleaning your headphones, it is important to power off your device. This ensures that no electrical current is running through the headphone jack, reducing the risk of damage to your device or your headphones.
Step 2: Gather Your Cleaning Tools
You will need a few tools to effectively clean your headphones. Here are the essential items you should have:
- Cotton Swabs: Cotton swabs are perfect for reaching into the small crevices of the headphone jack and removing dirt and debris.
- Isopropyl Alcohol: Isopropyl alcohol is a great cleaning agent that evaporates quickly and leaves no residue. It helps to dissolve any stubborn grime or build-up in the headphone jack.
Step 3: Remove Debris with a Dry Method
Start the cleaning process by using a dry method to remove any visible debris from the headphone jack. Take a cotton swab and gently insert it into the jack, rotating it to collect any dirt or dust. Be careful not to apply too much pressure, as this could damage the delicate components inside the jack.
Step 4: Clean with a Wet Method
If there is still residue or build-up in the headphone jack after the dry cleaning, it’s time to use a wet method. Dip a cotton swab into isopropyl alcohol and gently insert it into the jack. Again, rotate the swab to clean all the surfaces inside the jack. The alcohol will help dissolve any stubborn grime or debris.
Step 5: Let It Dry
After cleaning with the wet method, it is essential to let the headphone jack dry completely before using your headphones again. This will ensure that no moisture remains inside the jack, which could potentially damage your device or affect the audio quality. Allow the jack to air dry for at least 10-15 minutes before testing.
Step 6: Test Your Headphone Jack
Once the headphone jack is completely dry, you can test its functionality. Plug in your headphones and play some audio to ensure that both sides are working correctly and that the sound quality is clear and undistorted. If you notice any issues, repeat the cleaning process or consider seeking professional help.
Avoid Exposing Your Headphones to Dust and Moisture
In addition to regular cleaning, it is crucial to prevent your headphones from being exposed to dust and moisture. Dust particles can easily find their way into the headphone jack, causing blockages and affecting the audio quality. Moisture, on the other hand, can lead to corrosion and damage the internal components of your headphones.
To protect your headphones, consider the following tips:
- Store them in a clean and dry place when not in use. Avoid leaving them exposed to dusty environments or areas with high humidity.
- Use a protective case or pouch to keep your headphones safe from dust, moisture, and physical damage when carrying them around.
- Avoid using your headphones in wet or humid conditions, such as during heavy rain or while sweating excessively. Moisture can seep into the headphone jack and cause malfunctions.
By following these preventive measures, you can minimize the chances of build-up in your headphone jack and ensure that your headphones continue to deliver high-quality audio for a longer time.
Remember, regular cleaning and proper care are essential to maintain the performance and longevity of your headphones. Incorporate these tips into your headphone maintenance routine, and enjoy uninterrupted audio experiences every time you use your headphones.
Troubleshooting Common Issues
Are you experiencing audio problems with your headphones? Don’t worry, you’re not alone. Many headphone users encounter issues that can disrupt their listening experience. In this section, we will explore two common problems and provide you with solutions to fix them.
Sound Only Coming from One Side
It can be frustrating when you’re only able to hear audio from one side of your headphones. This issue is more common than you might think and can be caused by a few different factors. Here are some possible reasons why you might be experiencing this problem:
- Headphone Jack Connection: Before you start troubleshooting, check the connection between your headphones and the audio device. Ensure that the headphone plug is fully inserted into the jack. Sometimes, a loose connection can result in audio only coming from one side.
- Headphone Cable Damage: Over time, the cable connecting your headphones to the audio device can become damaged or frayed. This can cause the audio to cut out or only play on one side. Carefully inspect the cable for any visible signs of damage such as exposed wires or bends. If you notice any damage, it may be time to replace the cable.
- Balance Settings: Many audio devices have a balance control feature that allows you to adjust the volume balance between the left and right channels. It’s possible that the balance settings on your device have been inadvertently changed, resulting in audio only playing on one side. Check your device’s audio settings and make sure the balance is set to the center or equal position.
- Headphone Speaker Issue: If none of the above solutions work, it’s possible that there is an issue with the headphone speaker itself. This could be due to a loose connection or a faulty speaker. In this case, you may need to contact the manufacturer or seek professional help to get your headphones repaired or replaced.
Muffled or Distorted Audio
Another common issue that headphone users encounter is muffled or distorted audio. If you’re experiencing this problem, it can greatly impact your listening experience. Here are some potential causes and solutions to help you troubleshoot this issue:
- Dirty Headphone Jack: A dirty or dusty headphone jack can interfere with the audio signal and result in muffled or distorted sound. To fix this, you should clean the headphone jack using the methods outlined in the earlier section. Removing any debris or buildup can help restore the clarity of the audio.
- Audio Source Quality: Sometimes, the issue may not lie with your headphones but rather the audio source itself. Low-quality audio files or streaming services with poor sound quality can lead to muffled or distorted audio. Try listening to different audio sources or files to determine if the issue persists across all of them.
- Headphone Cushion Damage: Over time, the cushions or earpads on your headphones can deteriorate or become damaged. This can affect the sound quality by muffling or distorting the audio. If you notice any issues with the cushions, consider replacing them to restore the sound clarity.
- Headphone Compatibility: Some headphones may not be fully compatible with certain audio devices. This can result in muffled or distorted audio. Make sure that your headphones are compatible with the device you are using and check for any firmware updates that may improve compatibility.
By following these , you can hopefully resolve the common audio issues of sound only coming from one side or muffled and distorted audio. Remember to refer to the earlier sections for more detailed instructions on cleaning your headphone jack and preventing future build-up. If all else fails, don’t hesitate to seek professional help or contact the manufacturer for further assistance.
Additional Considerations
When it comes to cleaning your headphone jack, there are a few additional considerations to keep in mind. In this section, we’ll discuss how to clean wireless headphone jacks and when it might be necessary to seek professional help.
Cleaning Wireless Headphone Jacks
Cleaning the headphone jack on wireless headphones follows a similar process to cleaning wired ones, but there are a few key differences to be aware of. The main distinction is that wireless headphones have additional components, such as Bluetooth modules, that need to be taken into account during the cleaning process.
To clean the wireless headphone jack, start by ensuring that the headphones are powered off. This will prevent any potential damage to the internal components. Next, gather your cleaning tools, including cotton swabs and isopropyl alcohol.
Using a cotton swab dipped in isopropyl alcohol, gently clean the inside of the headphone jack. Be careful not to apply too much pressure or insert the swab too deeply, as this could damage the delicate components. Clean the jack in a circular motion, removing any debris or dirt that may have accumulated.
Once you’ve cleaned the jack, allow it to dry completely before using your wireless headphones again. This will help prevent any potential damage that could occur if moisture were to come into contact with the internal components.
Seeking Professional Help
In some cases, despite your best efforts, you may encounter issues with your headphone jack that require professional assistance. If you’ve followed the cleaning methods outlined in this guide and are still experiencing audio problems, it may be time to seek help from a professional technician.
Professional help can be especially beneficial if you’re dealing with more complex issues, such as muffled or distorted audio. These problems may be indicative of internal damage or a malfunctioning component that requires specialized knowledge to diagnose and repair.
When seeking professional help, it’s important to find a reputable technician or service center that specializes in headphone repairs. They will have the expertise and equipment necessary to accurately diagnose and fix the problem. Be sure to inquire about any warranties or guarantees they offer for their services, as this can provide peace of mind and protection for your investment.
While it can be tempting to try and fix headphone jack issues on your own, it’s important to know your limits. Attempting DIY repairs without the proper knowledge or tools can potentially cause further damage and void any warranties you may have. When in doubt, it’s best to consult with a professional who can provide the necessary expertise.
In conclusion, cleaning your headphone jack is an essential step in maintaining optimal audio quality and extending the lifespan of your headphones. By following the step-by-step guide outlined in this article and taking into account additional considerations such as cleaning wireless headphone jacks and seeking professional help when necessary, you can ensure that your headphones continue to provide you with the best listening experience possible.
