In this comprehensive guide, explore the different of kick drum mics, factors to consider when choosing one, techniques, tips for improving sound, and solutions to . Maintain and care for your kick drum mic to ensure optimal performance.
Types of Kick Drum Mics
When it comes to capturing the powerful and impactful sound of a kick drum, choosing the right microphone is crucial. There are several of kick drum mics available in the market, each with its own unique characteristics and benefits. Let's take a closer look at three popular of kick drum mics: dynamic mics, condenser mics, and ribbon mics.
Dynamic Mics
Dynamic microphones are the most common choice for kick drum miking due to their durability and ability to handle high sound pressure levels. They are designed to capture loud and powerful sounds, making them perfect for capturing the low-end frequencies produced by a kick drum.
One popular dynamic mic used for kick drums is the Shure SM57. It has a frequency response tailored to capture the deep and punchy tones of a kick drum, while also providing excellent attack and clarity. The SM57 is known for its rugged build quality, making it suitable for live performances and studio recordings alike.
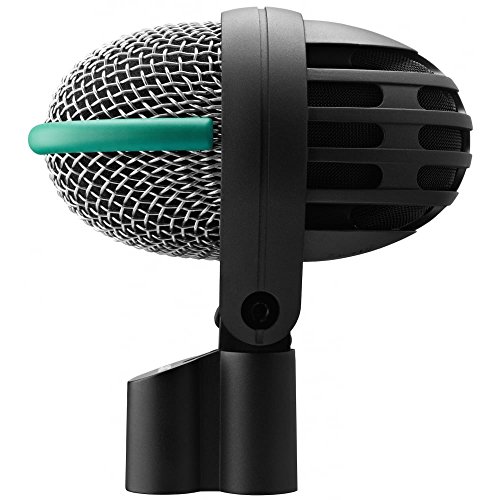
Another popular choice is the AKG D112, which features a large diaphragm for enhanced low-frequency response. It has a built-in windscreen that helps reduce plosive sounds and protects the microphone from any damage caused by the air pressure generated by the kick drum.
Dynamic mics are known for their ability to handle high SPLs, making them a reliable choice for capturing the impact and power of a kick drum. They are also more affordable compared to other of mics, making them a popular choice among drummers and sound engineers.
Condenser Mics
Condenser microphones are known for their sensitivity and accuracy in capturing detailed sound. While they are commonly used for vocals and acoustic instruments, they can also be a great choice for capturing the nuances of a kick drum.
One advantage of condenser mics is their extended frequency response, which allows them to capture the full range of frequencies produced by a kick drum. They are particularly effective in capturing the attack and the higher harmonics of the drum, resulting in a more detailed and defined sound.
The Audio-Technica AT2020 is a popular condenser mic used for kick drum applications. It features a low-mass diaphragm and a wide dynamic range, allowing it to capture the subtle nuances of the kick drum sound. It also has a cardioid polar pattern, which helps isolate the sound source and reduce unwanted background noise.
Condenser mics require phantom power to operate, which means they need an external power source. This can be provided by an audio interface or a mixer. While condenser mics are generally more expensive than dynamic mics, their accuracy and detail in capturing the kick drum sound make them a valuable choice for recording studios and professional drummers.
Ribbon Mics
Ribbon microphones are known for their smooth and vintage sound, making them a popular choice for capturing the warmth and character of a kick drum. They use a thin ribbon of metal as the diaphragm, which vibrates in response to sound waves.
Ribbon mics have a unique sonic signature, characterized by a natural roll-off in the higher frequencies and a smooth, warm low-end response. They are often used in conjunction with other mics to add depth and richness to the overall kick drum sound.
One well-known ribbon mic used for kick drums is the Royer R-121. It has a figure-eight polar pattern, which means it captures sound from the front and back while rejecting sound from the sides. This can be advantageous when recording in a live room or when trying to capture the room ambiance along with the kick drum sound.
It's important to note that ribbon mics are delicate and sensitive to high sound pressure levels. They require careful handling and should not be exposed to excessive air pressure or plosive sounds. However, when used correctly, ribbon mics can provide a unique and vintage character to the kick drum sound.
In conclusion, when choosing a kick drum mic, it is important to consider the type of mic that best suits your needs. Dynamic mics offer durability and reliability, condenser mics provide accuracy and detail, and ribbon mics deliver a vintage and warm sound. Each type has its own strengths and can contribute to capturing the perfect kick drum sound for your recordings or live performances. So, take your time, experiment, and find the mic that brings out the best in your kick drum.
Factors to Consider When Choosing a Kick Drum Mic
When it comes to selecting the perfect kick drum mic for your setup, there are several important factors to consider. Each of these factors plays a significant role in determining the overall sound quality and performance of your kick drum. Let’s take a closer look at three key factors: frequency response, polar pattern, and durability and build quality.
Frequency Response
The frequency response of a kick drum mic refers to the range of frequencies that the microphone can effectively capture. Kick drums produce low-frequency sounds that are rich in harmonics, so it is crucial to choose a mic that can accurately reproduce these low-end tones without distortion or muddiness.

Ideally, you’ll want a kick drum mic with a frequency response that extends down to at least 20Hz or lower. This will ensure that you capture the full depth and power of the kick drum, allowing it to cut through the mix and provide a solid foundation for the rest of the instruments.
Polar Pattern
The polar pattern of a microphone determines how it picks up sound from different directions. For kick drum mics, the most commonly used polar pattern is the cardioid pattern. This pattern captures sound primarily from the front while rejecting sound from the sides and rear. This helps to minimize unwanted bleed from other instruments and ensures that the kick drum remains the focus of the recording or live sound.
However, there are also kick drum mics available with other polar patterns, such as hypercardioid or supercardioid. These patterns offer even more focused pickup from the front, which can be beneficial in situations where there is a lot of ambient noise or stage volume.
Durability and Build Quality

The durability and build quality of a kick drum mic are essential factors to consider, especially if you plan on using it for live performances or in a studio setting where it may be subjected to regular handling and transportation. Kick drums can produce high sound pressure levels, and a mic that is not built to withstand these levels may experience distortion or damage.
Look for a kick drum mic that is made from sturdy materials and has a rugged construction. Consider features such as a metal housing, reinforced grilles, and shock mount mechanisms that can help protect the mic from accidental drops or impacts. Additionally, pay attention to the quality of the connectors and cables used, as these can also impact the overall durability and reliability of the microphone.
Placement Techniques for Kick Drum Mics
When it comes to capturing the perfect kick drum sound, the of the microphone plays a crucial role. There are different techniques that can be employed to achieve the desired sound, and it’s important to understand the options available. In this section, we will explore three key techniques for kick drum mics: inside the kick drum, outside the kick drum, and the choice between close-miking and distance-miking.
Inside the Kick Drum
Placing a microphone inside the kick drum can yield a powerful and punchy sound. This technique allows the microphone to capture the direct sound of the beater hitting the drumhead, resulting in a strong attack and low-end presence. To achieve this , simply position the microphone inside the kick drum, near the beater, facing towards the drumhead. Ensure that the microphone is securely mounted to withstand the vibrations and movement of the drum.
One advantage of placing the microphone inside the kick drum is the ability to capture the natural resonance of the drum. The proximity to the drumhead allows for a close and intimate sound, enhancing the overall impact of the kick drum in the mix. However, it’s important to note that this technique may require additional measures to control unwanted vibrations and resonances, such as using a soundhole reinforcement ring or a pillow inside the drum.

Outside the Kick Drum
Placing the microphone outside the kick drum can provide a different tonal character and capture more of the ambient sound of the drum. This technique is often used when a more natural and balanced sound is desired. To position the microphone outside the kick drum, place it a few inches away from the drumhead, facing towards the center of the drum.
By placing the microphone outside the kick drum, you allow it to capture the full spectrum of the drum’s sound, including the resonances and overtones. This can result in a more open and spacious sound that blends well with other instruments in the mix. Additionally, this technique reduces the risk of unwanted vibrations and resonances that can occur when the microphone is placed inside the drum.
Close-Miking vs. Distance-Miking
Choosing between close-miking and distance-miking is an important decision when placing a microphone for a kick drum. Close-miking involves positioning the microphone in close proximity to the drumhead, capturing a more focused and direct sound. On the other hand, distance-miking involves placing the microphone further away from the drum, capturing a more balanced and ambient sound.
Close-miking is often preferred when a tight and punchy sound is desired. It allows for greater control over the attack and low-end frequencies of the kick drum. By placing the microphone close to the drumhead, you can emphasize the transient and impact of each kick drum hit.
Distance-miking, on the other hand, provides a more natural and balanced sound. It captures the full range of the kick drum, including the resonance and overtones, resulting in a more organic and spacious sound. This technique is often used in genres such as jazz or acoustic music, where a more dynamic and roomy sound is desired.
Tips for Improving Kick Drum Mic Sound
When it comes to capturing the perfect kick drum sound, there are several tips and techniques that can greatly enhance the quality and impact of your recordings. In this section, we will explore three key aspects that can help you achieve a professional kick drum sound: using a soundhole reinforcement ring, positioning the mic at the sweet spot, and employing proper EQ and compression techniques.
Using a Soundhole Reinforcement Ring
One effective way to improve the sound of your kick drum mic is by using a soundhole reinforcement ring. This simple yet powerful accessory can make a significant difference in the overall tone and projection of your kick drum. The soundhole reinforcement ring is placed inside the drum, around the microphone, and helps to control unwanted resonances and vibrations that can muddy the sound.
By reducing these unwanted resonances, the soundhole reinforcement ring allows the kick drum to produce a cleaner and more focused sound. It helps to enhance the low-end frequencies and provides a tighter and punchier sound. This is especially useful when recording in live settings or in rooms with poor acoustics, where controlling the drum’s natural resonances can be challenging.
Positioning the Mic at the Sweet Spot
The positioning of the kick drum mic is crucial in capturing the desired sound. Placing the microphone at the sweet spot ensures that you capture the full range of frequencies and the optimal balance between attack and low-end thump. The sweet spot is typically located slightly off-center, towards the center of the drumhead, where the beater strikes the drum.
To find the sweet spot, experiment with different mic positions and listen carefully to the results. You can adjust the height and angle of the microphone to fine-tune the sound. Remember to position the mic close enough to capture the desired attack, but not too close to avoid distortion or clipping. The goal is to capture the natural characteristics of the kick drum while maintaining clarity and definition.

Proper EQ and Compression Techniques
In addition to using accessories and positioning the microphone correctly, employing proper EQ and compression techniques can greatly enhance the kick drum sound. EQ allows you to shape the frequencies of the kick drum, emphasizing the desirable characteristics and reducing any unwanted frequencies or resonances.
Start by boosting the low-end frequencies to bring out the thump and power of the kick drum. This can be done by increasing the low-frequency range between 50Hz and 80Hz. However, be careful not to overdo it, as excessive boosting can result in a boomy or muddy sound. Experiment with different EQ settings to find the right balance.
Compression is also an essential tool for achieving a professional kick drum sound. It helps to even out the dynamics of the drum, ensuring that the softer hits are audible while controlling any excessive peaks. Set a moderate compression ratio and adjust the threshold and attack settings to achieve the desired balance between the attack and sustain of the kick drum.
Remember to listen to the results and make small adjustments as needed. Each kick drum and recording environment is unique, so it’s important to trust your ears and make changes accordingly.
To summarize, improving the kick drum mic sound involves using a soundhole reinforcement ring to control unwanted resonances, positioning the mic at the sweet spot to capture the optimal balance between attack and low-end thump, and employing proper EQ and compression techniques to shape the sound and control dynamics. By implementing these tips, you can take your kick drum recordings to the next level and achieve a professional and impactful sound.
Common Kick Drum Mic Problems and Solutions
When it comes to kick drum mics, there are a few that musicians and sound engineers often encounter. Thankfully, there are solutions to these issues that can help improve the sound quality and overall performance of the kick drum mic.
Excessive Low-End Boom
One of the most with kick drum mics is an excessive low-end boom. This can create a muddy and overpowering sound that can be difficult to control. Fortunately, there are a few solutions to this problem.
- Positioning and EQ: Proper positioning of the kick drum mic can make a significant difference in reducing low-end boom. Placing the mic closer to the beater head can help capture more attack and less of the resonating low frequencies. Additionally, using EQ to cut or reduce the low frequencies can help clean up the sound and provide more definition to the kick drum.
- Soundhole Reinforcement Rings: Another solution to excessive low-end boom is to use a soundhole reinforcement ring. These rings are placed inside the kick drum and help to control the resonance and vibrations, resulting in a tighter and more focused sound. By reducing the unwanted low frequencies, the kick drum mic can capture a cleaner and more articulate sound.
Insufficient Attack or Definition
On the opposite end of the spectrum, some kick drum mics may suffer from insufficient attack or definition. This can make the kick drum sound weak and lack impact. Fortunately, there are ways to address this problem.
- Mic Placement: Proper mic is crucial in capturing the attack and definition of the kick drum. Placing the mic closer to the beater head can help capture the initial attack and transient of the drum, resulting in a more impactful sound. Experimenting with different mic positions and angles can help find the sweet spot that enhances the attack and definition.
- Proper EQ and Compression: Another solution is to use proper EQ and compression techniques. Boosting the midrange frequencies can help bring out the attack and definition of the kick drum. Additionally, using compression can help control the dynamic range of the kick drum, ensuring that the softer hits are audible without overpowering the mix.
Feedback Issues
Feedback can be a frustrating problem when using kick drum mics. It can occur when the sound from the kick drum is picked up by the mic and amplified, leading to a high-pitched squeal or howl. Here are some solutions to address feedback issues.
- Microphone Placement: Proper microphone is crucial in minimizing feedback. Placing the kick drum mic at a distance from other sound sources, such as monitors or loudspeakers, can reduce the chances of feedback occurring. Additionally, angling the mic away from the monitors can help further minimize the risk of feedback.
- Using a Supercardioid or Hypercardioid Mic: Choosing a kick drum mic with a tighter polar pattern, such as a supercardioid or hypercardioid, can help reject sound from other directions and focus on the sound source. This can reduce the likelihood of feedback occurring.
- Utilizing a Feedback Eliminator: Another solution is to use a feedback eliminator or suppressor. These devices are designed to automatically detect and eliminate feedback frequencies, providing a cleaner and more stable sound. They can be particularly useful in live performance situations where feedback issues are more common.
By addressing these common kick drum mic problems, musicians and sound engineers can achieve a better sound quality and improve the overall performance of the kick drum. Whether it’s reducing excessive low-end boom, enhancing attack and definition, or tackling feedback issues, there are solutions available to ensure that the kick drum sounds its best in any musical setting.
Maintenance and Care for Kick Drum Mics
When it comes to ensuring the longevity and optimal performance of your kick drum mics, proper and care are essential. By implementing a few simple practices, you can keep your mics in great condition and maintain their pristine sound quality for years to come. In this section, we will explore three key aspects of and care: cleaning and sanitizing, storing and transporting properly, and replacing worn-out parts.
Cleaning and Sanitizing
Cleaning and sanitizing your kick drum mics is crucial for maintaining their performance and preventing the buildup of dirt, dust, and bacteria. Regular cleaning not only keeps your mics looking their best, but it also ensures that they continue to capture the sound accurately.
To clean your kick drum mics, follow these simple steps:
- Start by gently removing any visible debris or dust from the microphone grille using a soft brush or cloth.
- Use a mild cleaner specifically designed for microphones to wipe down the exterior of the mic. Avoid using harsh chemicals or abrasive materials that could damage the microphone’s finish.
- Pay special attention to the microphone grille, as this is where most dirt and debris accumulate. Use a clean, small brush to gently remove any stubborn particles.
- If your microphone has a detachable windscreen or pop filter, remove it and clean it separately according to the manufacturer’s instructions.
- Allow the mic to air dry completely before using it again.
Regular sanitization is also important, especially if you share your kick drum mics with other musicians. Use a sanitizer specifically formulated for audio equipment to disinfect the microphone, paying close attention to the areas that come into direct contact with the user’s mouth.
Storing and Transporting Properly
Proper storage and transportation of your kick drum mics can significantly extend their lifespan and prevent unnecessary damage. Here are some tips to ensure you handle your mics with care:
- Invest in a dedicated microphone case or bag that provides ample protection during transportation. Look for a case with foam padding or shock-absorbing materials to shield your mics from any impact or jostling.
- When storing your mics, make sure they are placed in a clean and dry environment to prevent moisture damage. Avoid exposing them to extreme temperatures or humidity levels.
- If you have multiple kick drum mics, consider using a microphone stand or rack to keep them organized and prevent accidental falls or damage.
- Always disconnect the microphone cables properly by gently twisting them while pulling, rather than yanking on the cable itself. This helps prevent strain on the cable connectors and ensures a longer lifespan for your mics.
By implementing these storage and transportation practices, you can safeguard your kick drum mics from unnecessary wear and tear, ensuring they are always ready for top-notch performance.
Replacing Worn-Out Parts
Despite regular and care, certain parts of your kick drum mics may eventually wear out or become damaged. It is important to identify these issues and replace the worn-out parts promptly to maintain optimal performance.
Here are some common parts that may require replacement:
- Microphone Grille: Over time, the microphone grille may become dented or lose its shape, affecting the sound quality. If you notice any damage, consider replacing the grille with a genuine replacement part from the manufacturer.
- XLR Connectors: The XLR connectors, which are responsible for connecting the microphone to the audio interface or mixer, can wear out due to frequent plugging and unplugging. If you experience intermittent connectivity or signal issues, it may be time to replace the XLR connectors.
- Shock Mounts and Mounting Rings: These components help isolate the microphone from vibrations and handling noise. If you notice excessive noise or lack of stability, replacing the shock mounts or mounting rings can greatly improve the performance of your kick drum mics.
- Internal Components: In some cases, internal components such as diaphragms or circuitry may need replacement due to wear or damage. It is recommended to consult a professional technician or contact the manufacturer for assistance in replacing these parts.
Regularly inspecting your kick drum mics for any signs of wear or damage and promptly replacing worn-out parts will ensure that your mics continue to deliver outstanding sound quality and performance.
In conclusion, proper and care for kick drum mics are essential for their longevity and optimal performance. By following the cleaning and sanitizing guidelines, storing and transporting your mics properly, and replacing worn-out parts when necessary, you can ensure that your kick drum mics remain in top shape for years to come. Remember, a well-maintained microphone not only enhances your drumming sound but also saves you from unnecessary expenses in the long run. So, prioritize the care of your kick drum mics and enjoy the best possible sound every time you perform.
