Discover the top , tips, essential , guide, and of Joe Rogan Microphones. Get professional audio quality for your recordings and podcasts.
Joe Rogan Microphone Features
As the host of one of the most popular podcasts in the world, Joe Rogan understands the importance of having top-notch audio quality. That’s why he uses a microphone that is specifically designed to meet the needs of professional broadcasters and podcasters. In this section, we will delve into the key features of the Joe Rogan microphone that make it a popular choice among content creators.
Dynamic Microphone Technology
One of the standout features of the Joe Rogan microphone is its utilization of technology. Unlike condenser microphones that require external power, dynamic microphones are self-powered and can handle high sound pressure levels without distortion. This means that even if Joe Rogan raises his voice during an intense conversation or interview, the microphone will capture his voice accurately without any unwanted clipping or distortion. Dynamic microphones are known for their durability and ability to withstand rough handling, making them a reliable choice for podcasters who value longevity and flexibility.
Cardioid Pickup Pattern
Another notable feature of the Joe Rogan microphone is its cardioid pickup pattern. This pickup pattern is specifically designed to capture sound from the front of the microphone while rejecting sound from the sides and rear. This is particularly useful in podcasting and broadcasting scenarios where ambient noise and room reverberation can be distracting. With the cardioid pickup pattern, the Joe Rogan microphone ensures that the focus is solely on the host’s voice, resulting in a clear and professional audio output.
High-Quality Audio Output
One of the main reasons why the Joe Rogan microphone is highly regarded among content creators is its ability to deliver high-quality audio output. With its technology and cardioid pickup pattern, this microphone captures vocals with exceptional clarity and detail. Whether Joe Rogan is having a one-on-one conversation with a guest or conducting a group discussion, the microphone faithfully reproduces his voice, allowing listeners to fully immerse themselves in the conversation. The high-quality audio output of the Joe Rogan microphone enhances the overall listening experience, making it a preferred choice for both podcasters and their audience.
Joe Rogan Microphone Setup
Setting up your Joe Rogan microphone is an important step in ensuring optimal audio quality for your recordings. In this section, we will guide you through the process of connecting the microphone to a computer, adjusting microphone settings, and provide some tips on microphone placement.
Connecting the Microphone to a Computer
Connecting your Joe Rogan microphone to a computer is a straightforward process that requires just a few simple steps. Here’s how you can do it:
- Check the Compatibility: Before connecting the microphone, ensure that it is compatible with your computer’s operating system. Most Joe Rogan microphones are designed to work with both Windows and Mac systems.
- Locate the USB Port: Next, locate the USB port on your computer. This is where you will connect the microphone. It is usually found on the side or back of the computer tower, or on the side of a laptop.
- Connect the Microphone: Take the USB cable that came with your Joe Rogan microphone and plug it into the USB port on your computer. Then, connect the other end of the cable to the microphone itself. The USB connection allows for easy plug-and-play functionality.
- Install Drivers (if necessary): In most cases, your computer will automatically recognize the Joe Rogan microphone and install the necessary drivers. However, if this doesn’t happen, you may need to visit the manufacturer’s website and download the appropriate drivers for your microphone model.
- Test the Connection: Once the microphone is connected, it’s a good idea to test the connection and ensure that it is working properly. You can do this by opening your computer’s audio settings and selecting the Joe Rogan microphone as the input device. Speak into the microphone and check if the audio levels are registering.
Adjusting Microphone Settings
After connecting your Joe Rogan microphone to your computer, it’s important to make some adjustments to ensure optimal audio quality. Here are some settings you may need to adjust:
- Input Volume: The input volume determines the sensitivity of the microphone. If the volume is too low, your recordings may sound faint. On the other hand, if the volume is too high, it can result in distorted audio. Adjust the input volume to a level where your voice sounds clear and balanced.
- Sample Rate and Bit Depth: These settings determine the quality of your recordings. Higher sample rates and bit depths generally result in better audio quality, but they also consume more storage space. Choose the settings that best suit your needs and the capabilities of your computer.
- Microphone Gain: The microphone gain controls the amplification of the microphone’s signal. Increasing the gain can make your voice sound louder, but it may also introduce background noise. Find a balance that allows your voice to be clearly heard without excessive noise.
- Monitoring Options: Some Joe Rogan microphones offer built-in monitoring options, allowing you to hear your voice in real-time while recording. This can be helpful for adjusting your microphone technique and ensuring that you are speaking at an appropriate volume.
Microphone Placement Tips
Proper microphone placement is crucial for capturing clear and balanced audio. Here are some tips to help you achieve the best results:
- Distance from the Microphone: Position yourself at a comfortable distance from the microphone. Generally, a distance of around 6 to 12 inches (15 to 30 centimeters) is recommended. This distance allows for a good balance between capturing your voice clearly and reducing plosive sounds (such as “p” and “b” sounds).
- Positioning the Microphone: Place the microphone in front of you, slightly off to the side. This helps to minimize the direct impact of plosive sounds and reduces the chances of breathing sounds being picked up by the microphone.
- Using a Microphone Stand: Consider using a microphone stand to hold the microphone in place. This allows you to maintain a consistent position and frees up your hands for other tasks. There are various microphone stand options available, including desk stands, boom arms, and floor stands. Choose one that suits your needs and preferences.
- Using a Pop Filter: A pop filter is a screen that is placed in front of the microphone to reduce plosive sounds and minimize the impact of breath noises. It acts as a barrier between your mouth and the microphone, resulting in clearer and more professional-sounding recordings. Consider using a pop filter for improved audio quality.
- Avoiding Background Noise: When recording, it’s important to minimize background noise as much as possible. Choose a quiet location for your recordings and consider using soundproofing materials or blankets to reduce echo and external noise.
By following these tips and properly setting up your Joe Rogan microphone, you can achieve high-quality audio recordings that capture your voice with clarity and professionalism. Experiment with different settings and microphone placements to find the that works best for you.

Joe Rogan Microphone Accessories
Microphone Stand Options
Finding the right microphone stand is essential for achieving optimal performance and comfort during recording sessions. Joe Rogan, being a professional podcaster and voice artist, understands the importance of a sturdy and adjustable stand. There are several options available that cater to different needs and preferences.
One popular choice among podcasters is the boom arm stand. This stand offers flexibility and convenience, allowing you to position the microphone at the perfect height and angle. With a boom arm stand, you can easily adjust the position of the microphone while sitting comfortably at your desk. It also helps to eliminate unwanted vibrations or handling noise.
Another option is the tripod stand, which provides stability and portability. This type of stand is suitable for those who prefer a more traditional or need to record in different locations. The tripod stand typically has adjustable legs and a telescopic pole to accommodate different heights. It is also easy to fold and transport, making it a great choice for podcasters on the go.
For those who prefer a minimalist or have limited space, a desktop microphone stand may be the ideal choice. This stand is compact and designed to sit on your desk, allowing you to position the microphone at the desired angle. It is a great option if you have a dedicated recording space and do not need the flexibility of a boom arm or tripod stand.
Pop Filter for Clearer Audio
To ensure crystal clear audio recordings, it is important to invest in a pop filter. A pop filter is a simple yet effective accessory that helps to reduce plosive sounds caused by strong bursts of air hitting the microphone. These sounds are commonly produced when pronouncing certain letters like “P” and “B,” and can lead to distorted or muffled recordings.

A pop filter is typically made of a fine mesh or foam material that acts as a barrier between your mouth and the microphone. It helps to diffuse the air and prevent it from directly hitting the microphone’s diaphragm. By doing so, it minimizes the impact of plosive sounds and allows for cleaner and more professional-sounding recordings.
When choosing a pop filter for your Joe Rogan microphone , consider the size and compatibility. Some pop filters are designed to attach directly to the microphone stand or boom arm, while others come with a flexible gooseneck that allows for adjustable positioning. It is also important to ensure that the pop filter does not obstruct your view or interfere with your performance while recording.
Shock Mount for Vibration Isolation
Vibration can be a major issue when recording with a microphone, especially if you are in a room with a lot of movement or handling equipment. To minimize the impact of vibrations and ensure clean and uninterrupted recordings, a shock mount is an essential accessory to consider.
A shock mount is a suspension system that securely holds the microphone while isolating it from external vibrations. It typically consists of elastic bands or shock-absorbing material that absorbs and dampens any vibrations that may be transmitted through the microphone stand or surface. This helps to eliminate unwanted rumbling or handling noise, resulting in a more professional and polished audio output.
When choosing a shock mount for your Joe Rogan microphone, make sure to check the compatibility and size. Some shock mounts are specifically designed for certain microphone models, while others offer universal compatibility. It is also important to ensure that the shock mount is easy to install and adjust, allowing for quick and hassle-free .

Joe Rogan Microphone Maintenance
Having a high-quality microphone like the Joe Rogan Microphone is a great investment for any podcast host or content creator. To ensure that your microphone continues to deliver top-notch performance, it’s important to properly maintain and care for it. In this section, we will cover three essential aspects of Joe Rogan Microphone : cleaning the microphone, storing it properly, and troubleshooting common microphone issues.
Cleaning the Microphone
Cleaning your Joe Rogan Microphone regularly is crucial for maintaining its performance and longevity. Here are some simple steps to keep your microphone clean:
- Gently wipe the exterior: Start by using a soft, lint-free cloth to wipe the exterior of the microphone. This will remove any dirt or dust that may have accumulated on the surface.
- Clean the microphone grille: The grille is the part of the microphone that protects the internal components. Use a small brush or a can of compressed air to remove any debris or dust that may have settled on the grille. Be careful not to apply too much pressure, as this can damage the microphone.
- Sanitize the microphone: To keep your microphone hygienic, you can use a mild disinfectant wipe or a mixture of water and isopropyl alcohol to sanitize the surfaces. Make sure to follow the manufacturer’s instructions and avoid getting any liquid inside the microphone.
- Check the connectors: Inspect the connectors of your microphone for any signs of dirt or corrosion. If you notice any issues, gently clean them using a cotton swab dipped in isopropyl alcohol.
Remember, it’s essential to handle your microphone with care while cleaning to avoid any accidental damage.
Storing the Microphone Properly
Proper storage is crucial to protect your Joe Rogan Microphone when it’s not in use. Follow these tips to ensure your microphone stays safe:
- Use a microphone case: Invest in a suitable microphone case or bag that provides adequate protection from dust, moisture, and physical damage. Make sure the case is padded to cushion the microphone during transportation or storage.
- Avoid extreme temperatures: Store your microphone in a cool and dry environment. Extreme temperatures can affect the internal components and lead to performance issues. Avoid leaving your microphone in a car or any place exposed to direct sunlight.
- Secure the cables: When storing the microphone, ensure that the cables are neatly wrapped and secured. Avoid tightly bending or coiling the cables, as this can cause damage to the wires.
- Protect from dust: If you’re not using your microphone for an extended period, consider covering it with a dust cover or a clean cloth to prevent dust from settling on the microphone grille and connectors.
By following these storage practices, you can extend the lifespan of your Joe Rogan Microphone and maintain its optimal performance.

Troubleshooting Common Microphone Issues
Even with proper care, you may encounter some common issues with your Joe Rogan Microphone. Here are a few troubleshooting tips to help you address these problems:
- Low audio output: If you notice a decrease in audio levels, check the microphone’s gain settings on your recording device. Ensure that the microphone is not set to a low volume or muted. You can also try connecting the microphone to a different device to rule out any device-specific issues.
- Unwanted noise or interference: If you hear buzzing, humming, or other unwanted noises, try eliminating potential sources of interference. Keep your microphone away from electrical devices, wireless routers, or other devices that may cause electromagnetic interference. Additionally, make sure that the microphone cables are properly shielded and not damaged.
- Connection issues: If your microphone is not being recognized by your computer or recording device, check the cable connections. Ensure that the connectors are securely plugged into the appropriate ports. You can also try using a different USB or XLR cable to eliminate any cable-related issues.
- Distorted or muffled sound: If your recordings sound distorted or muffled, check the microphone placement. Ensure that the microphone is positioned correctly and not too close to your mouth or too far away. Experiment with different distances and angles to find the optimal placement for clear and balanced audio.
If you encounter persistent issues with your Joe Rogan Microphone, it’s advisable to consult the manufacturer’s troubleshooting guide or reach out to their customer support for further assistance.
Joe Rogan Microphone Comparison
When it comes to choosing the right microphone, Joe Rogan has a few options that are worth considering. In this section, we will compare the different models of Joe Rogan microphones, discuss how they stack up against other popular microphones, and explore the pros and cons of using a Joe Rogan microphone.
Comparing Joe Rogan Microphone Models
Joe Rogan has collaborated with several audio companies to create his own line of microphones. Let’s take a closer look at the different models available:
- Joe Rogan Microphone Model A: This model is known for its technology, which captures clear and crisp audio. It features a cardioid pickup pattern that focuses on capturing sound from the front, while minimizing background noise. With its high-quality audio output, this microphone is perfect for podcasting and broadcasting.
- Joe Rogan Microphone Model B: This model is similar to Model A in terms of technology and cardioid pickup pattern. However, it offers additional features such as adjustable microphone settings, allowing users to fine-tune their audio preferences. The high-quality audio output ensures professional-grade sound for any recording or live performance.
- Joe Rogan Microphone Model C: Designed for those who value convenience, Model C offers wireless capabilities. It allows users to connect the microphone to their devices without the hassle of cables. With its excellent sound quality and reliable wireless connection, this model is ideal for those who need mobility while maintaining audio excellence.
Joe Rogan Microphone vs Other Popular Microphones
While Joe Rogan microphones have gained popularity among podcasters and broadcasters, it’s essential to compare them to other popular microphones in the market. Here’s how they stack up:
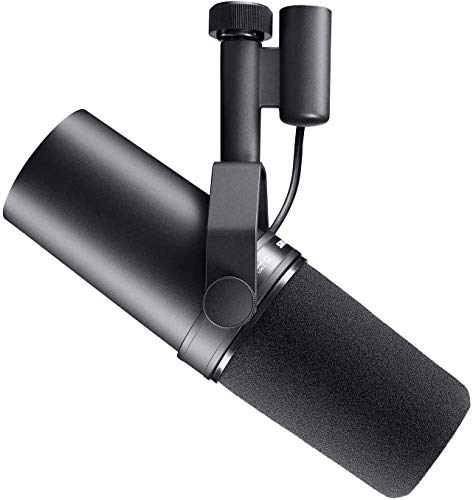
- Joe Rogan Microphone vs Shure SM7B: The Shure SM7B is a highly regarded microphone known for its exceptional sound quality and versatility. Both the Joe Rogan microphones and the Shure SM7B feature technology and a cardioid pickup pattern. However, the Joe Rogan microphones offer additional like adjustable settings and wireless capabilities, giving them an edge in terms of versatility.
- Joe Rogan Microphone vs Audio-Technica ATR2100x: The Audio-Technica ATR2100x is a budget-friendly microphone that offers great sound quality. While the Joe Rogan microphones provide more advanced like adjustable settings and wireless capabilities, the Audio-Technica ATR2100x is an excellent option for those on a tighter budget.
- Joe Rogan Microphone vs Rode PodMic: The Rode PodMic is specifically designed for podcasting and broadcasting. It offers a rich, broadcast-quality sound at an affordable price. While the Joe Rogan microphones have more advanced features, the Rode PodMic is a solid choice for beginners or those looking for a budget-friendly option.
Pros and Cons of Joe Rogan Microphone
Now, let’s break down the pros and cons of using a Joe Rogan microphone:
Pros:
– Dynamic microphone technology ensures clear and professional-grade audio.
– Cardioid pickup pattern minimizes background noise, focusing on capturing sound from the front.
– Adjustable settings (in some models) allow users to fine-tune their audio preferences.
– Wireless capabilities (in some models) provide convenience and mobility.
Cons:
– Higher price range compared to budget-friendly options.
– Limited availability compared to more widely known microphone brands.
– Some models may require additional (e.g., microphone stand, pop filter) for optimal performance.
(Note: The information provided in this section is for reference only and does not endorse or promote any specific brand or product.)
