Explore the features and benefits of the Joe Rogan microphone, known for its high-quality audio recording and durable design. Learn how to set up, troubleshoot, and maintain the microphone for optimal performance. Compare it to other top brands like Audio Technica, Shure, and Rode.
Features of Joe Rogan Microphone
When it comes to choosing a microphone, the Joe Rogan Microphone stands out with its impressive features. Let’s dive into what makes this microphone a top choice for audio enthusiasts.
High-quality audio recording
One of the standout features of the Joe Rogan Microphone is its ability to deliver high-quality audio recordings. Whether you are a podcast host, a musician, or a content creator, having crystal-clear sound is crucial. This microphone ensures that every word spoken or sung is captured with exceptional clarity.
The Joe Rogan Microphone is equipped with advanced audio technology that enhances the recording process. It boasts a wide frequency range, allowing it to capture both the lows and highs of your voice or instrument. This ensures that every nuance and detail is picked up, resulting in a professional-grade recording.
Additionally, the microphone has a high signal-to-noise ratio, which means that it effectively minimizes background noise and interference. This feature is especially important for those recording in noisy environments or for podcasters who want to provide their listeners with a clean and immersive experience.

Durable and long-lasting design
Durability is another key feature of the Joe Rogan Microphone. Made with high-quality materials, this microphone is built to withstand the rigors of regular use. Whether you’re constantly on the move or recording in a studio, you can rely on the Joe Rogan Microphone to deliver consistent performance.
The microphone’s robust construction ensures that it can withstand accidental drops or bumps without compromising its functionality. This is particularly important for those who are always on the go, as it provides peace of mind knowing that their microphone is built to last.
Noise-canceling technology
Another impressive feature of the Joe Rogan Microphone is its noise-canceling technology. This innovative feature eliminates background noise and interference, allowing for a cleaner and more focused recording.
Whether you’re recording in a noisy room or outdoors, the microphone’s noise-canceling technology filters out unwanted sounds, ensuring that your voice or instrument takes center stage. This is particularly beneficial for podcasters or musicians who want to create professional-sounding recordings without the hassle of post-production editing.
With the Joe Rogan Microphone, you can enjoy a seamless recording experience, free from distractions and unwanted noise.
Types of Joe Rogan Microphone
There are three main types of Joe Rogan microphones available: USB microphones, XLR microphones, and wireless microphones. Each type has its own unique features and benefits, catering to different recording needs and preferences.
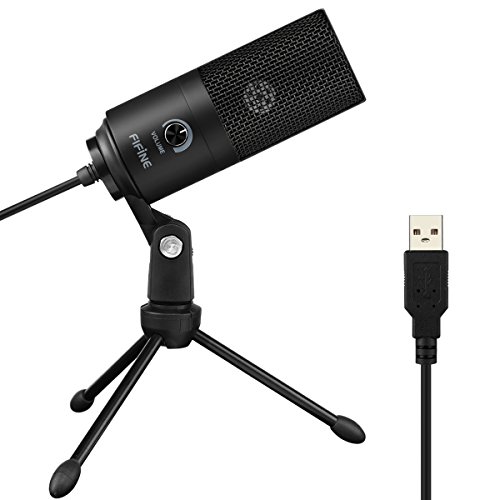
USB Microphones
USB microphones are a popular choice for beginners and casual users due to their simplicity and ease of use. These microphones can be directly connected to a computer or laptop via a USB port, eliminating the need for additional audio interfaces or mixers.
- Plug-and-Play: One of the key advantages of USB microphones is their plug-and-play functionality. Simply connect the microphone to your computer, and you’re ready to start recording. This makes them ideal for podcasting, streaming, voiceovers, and other online content creation.
- Versatility: USB microphones are versatile and can be used with various recording software and platforms. They often come with built-in headphone jacks for real-time monitoring, volume controls, and mute buttons for added convenience during recordings.
- Portability: Many USB microphones are compact and lightweight, making them portable and easy to carry around. This means you can take your microphone with you wherever you go, ensuring high-quality audio recordings on the fly.
XLR Microphones

XLR microphones are a preferred choice among professional users and those who require studio-quality audio recordings. These microphones use an XLR connector, which requires an audio interface or mixer for connectivity.
- Superior Audio Quality: XLR microphones are known for their superior audio quality, capturing every detail and nuance of the sound. They often have larger diaphragms and advanced internal components, resulting in rich, clear, and professional-grade recordings.
- Flexibility and Customization: XLR microphones offer greater flexibility and customization options. With an audio interface, you can adjust various settings such as gain, EQ, and phantom power to tailor the sound to your specific needs. This makes them ideal for music production, vocal performances, and professional podcasting.
- Expandability: XLR microphones allow for expandability and scalability. As your recording setup evolves, you can easily incorporate additional microphones, mixers, and other equipment to create a comprehensive audio production system.
Wireless Microphones
Wireless microphones provide the freedom of movement and flexibility during recordings or performances. They eliminate the need for cables, allowing you to move around without restrictions while maintaining high-quality audio.
- Mobility and Convenience: Wireless microphones offer mobility and convenience, making them ideal for live performances, presentations, and interviews. You can freely move around the stage or room without worrying about tripping over cables or being tethered to a specific location.
- Range and Signal Stability: Wireless microphones come with different ranges, allowing you to choose the one that suits your needs. They utilize advanced wireless technology to ensure stable and interference-free signals, resulting in crystal-clear audio transmission.
- Multiple Channel Options: Many wireless microphones offer multiple channel options, enabling you to use multiple microphones simultaneously without interference. This is particularly useful in situations where multiple speakers or performers need to be heard clearly.
Setting up Joe Rogan Microphone
Setting up your Joe Rogan Microphone is a straightforward process that will have you recording high-quality audio in no time. In this section, we will guide you through the steps of connecting the microphone to a computer or audio interface, adjusting the microphone settings for optimal sound quality, and positioning the microphone for the best recording results.
Connecting the microphone to a computer or audio interface
To connect your Joe Rogan Microphone to a computer or audio interface, follow these simple steps:
- Check the compatibility: Before connecting the microphone, ensure that it is compatible with your computer or audio interface. The Joe Rogan Microphone is designed to work with both Windows and Mac operating systems, as well as most audio interfaces.
- Choose the appropriate cable: Depending on the type of connection you prefer, select either a USB or XLR cable. USB cables are ideal for direct connection to your computer, while XLR cables are commonly used with audio interfaces.
- Connect the cable: Plug one end of the cable into the microphone’s port, and the other end into the corresponding port on your computer or audio interface. Ensure a secure connection to avoid any audio interruptions during recordings.
- Check the settings: Once connected, access your computer’s audio settings or audio interface’s control panel to verify that the Joe Rogan Microphone is recognized as the input device. Adjust the input level if necessary, ensuring it is not set too high or too low.
Adjusting microphone settings for optimal sound quality
To achieve the best sound quality with your Joe Rogan Microphone, consider the following tips for adjusting the microphone settings:
- Gain control: The gain control on the microphone allows you to adjust the microphone’s sensitivity to sound. Start with a moderate setting and make fine adjustments as needed while monitoring the sound through headphones or speakers. Avoid setting the gain too high, as it may result in distorted or clipped audio.
- Polar patterns: Some Joe Rogan Microphones offer different polar patterns, such as cardioid, omnidirectional, or figure-eight. These patterns determine the directionality of the microphone and can be adjusted based on your recording environment. For solo recordings, the cardioid pattern is commonly used, as it focuses on capturing sound from the front while minimizing background noise.
- Pop filter usage: Attaching a pop filter to your Joe Rogan Microphone can help reduce plosive sounds, such as “p” or “b” sounds, that can cause distortion in the audio. Position the pop filter a few inches away from the microphone, ensuring it covers the front of the microphone without obstructing your voice.
Positioning the microphone for best recording results
Proper positioning of the Joe Rogan Microphone plays a crucial role in capturing clear and professional-grade audio. Consider the following suggestions when positioning your microphone:
- Distance from the mouth: Position the microphone at a distance of about 6-12 inches from your mouth to achieve a balanced and natural sound. Adjust the distance based on the volume and intensity of your voice to prevent distortion or clipping.
- Angling the microphone: Tilt the microphone slightly downwards to capture the sound accurately and reduce any potential reflections or unwanted background noise. Experiment with different angles to find the sweet spot that delivers the best sound quality for your specific voice.
- Acoustic environment: Consider the acoustic properties of your recording space. Minimize ambient noise by choosing a quiet room or using soundproofing materials to reduce echoes or reverberations. Experimenting with positioning and using a microphone isolation shield can further enhance the audio quality by reducing unwanted reflections.
Troubleshooting Joe Rogan Microphone Issues
Microphone not being recognized by the computer
Are you facing the frustration of your Joe Rogan microphone not being recognized by your computer? Don’t worry, this issue can be easily resolved with a few troubleshooting steps.
Firstly, ensure that the microphone is properly connected to your computer. Check the USB or XLR cable connection and make sure it is securely plugged in. If you are using a wireless microphone, ensure that it is properly paired with the receiver.
Next, check the device settings on your computer. Go to the sound settings and make sure that the Joe Rogan microphone is selected as the default input device. Sometimes, the microphone may appear as an unrecognized device. In such cases, try disconnecting and reconnecting the microphone or restarting your computer.
If the above steps do not resolve the issue, it is recommended to check for driver updates. Visit the official Joe Rogan microphone website or the manufacturer’s website to download and install the latest drivers for your microphone model. Outdated or incompatible drivers can sometimes cause the microphone to not be recognized by the computer.
In rare cases, the issue may be with the USB or XLR port on your computer. Try connecting the microphone to a different port and check if it is recognized. If it works on another port, then the original port may be faulty and you may need to seek professional assistance to repair or replace it.
Remember, troubleshooting can be a process of trial and error. If you have tried all the steps mentioned above and your Joe Rogan microphone is still not being recognized by your computer, it is advisable to reach out to the customer support of the microphone manufacturer for further assistance. They will be able to provide you with specific troubleshooting steps based on your microphone model.
Poor sound quality or low volume
Are you experiencing poor sound quality or low volume issues with your Joe Rogan microphone? Don’t worry, we’re here to help you troubleshoot and improve your recording experience.
Firstly, check the microphone settings on your computer or audio interface. Make sure that the input volume is set appropriately. Adjust the input gain or volume control on your microphone to achieve the desired sound level. Additionally, check the input level settings in your recording software to ensure they are not set too low.
If you are using a USB microphone, try using a different USB port on your computer. Sometimes, certain USB ports may not provide enough power to the microphone, resulting in low volume or poor sound quality. Switching to a different port can often resolve this issue.
Another common cause of poor sound quality is background noise or interference. Make sure that you are recording in a quiet environment. Avoid placing the microphone near sources of electrical interference, such as computer monitors or Wi-Fi routers. Additionally, consider using a pop filter to minimize plosive sounds and a shock mount to reduce vibrations and handling noise.
If you are still experiencing poor sound quality or low volume after trying the above steps, it is worth checking the microphone itself. Ensure that the microphone capsule is clean and free from any debris that may affect its performance. If necessary, refer to the microphone’s user manual for specific cleaning instructions.
In some cases, the issue may be related to the recording software or settings. Check for any updates or patches for your recording software and make sure that it is configured correctly for your microphone. If you are using a digital audio workstation (DAW), review the input settings and check if any effects or filters are affecting the sound quality.
Remember, troubleshooting sound quality issues can be a process of experimentation. Try adjusting different settings and configurations to find the optimal setup for your Joe Rogan microphone. If all else fails, consider reaching out to the customer support of the microphone manufacturer for further assistance and guidance.
Experiencing background noise or interference
Are you experiencing background noise or interference while using your Joe Rogan microphone? Don’t let unwanted sounds ruin your recordings. Follow these troubleshooting steps to minimize background noise and ensure clean audio.
Firstly, check your recording environment. Background noise can be caused by various sources such as fans, air conditioning units, or outside traffic. Try to find a quiet space to record and minimize any potential sources of noise. Using soundproofing materials or acoustic panels can also help reduce unwanted echoes or reverberations.
If you are using a condenser microphone, ensure that phantom power is properly enabled. Most condenser microphones require phantom power to operate correctly. Check the settings on your audio interface or mixer to make sure that phantom power is turned on.
Another common cause of background noise is electrical interference. Make sure that your microphone cables are properly shielded and not running alongside power cables or other electronic devices. Using high-quality cables and avoiding cable clutter can help reduce interference.
Consider using a noise gate or noise reduction plugin in your recording software. These tools can help eliminate or reduce background noise during the editing process. Experiment with the settings to find the right balance between noise reduction and preserving the natural sound of your recordings.
If you are still experiencing background noise or interference, it may be worth trying a different microphone placement. Adjust the position of the microphone and experiment with different angles to find the sweet spot that captures your voice while minimizing background noise. A microphone boom arm or stand can also help isolate the microphone from any vibrations or handling noise.
In some cases, external factors such as radio frequency interference (RFI) or electromagnetic interference (EMI) can cause background noise. If you suspect this to be the case, try moving away from sources of interference, such as wireless routers or cellphones. Additionally, using a microphone with built-in noise-canceling technology can help mitigate these issues.
Remember, troubleshooting background noise or interference requires patience and experimentation. Try different techniques and settings to find the best solution for your specific recording setup. If you are still struggling with excessive background noise, consider reaching out to the customer support of the microphone manufacturer for further assistance and recommendations.
Maintaining Joe Rogan Microphone
Taking proper care of your Joe Rogan Microphone is essential to ensure its longevity and optimal performance. In this section, we will discuss some important maintenance tasks that will help you keep your microphone in top-notch condition for years to come.
Cleaning the microphone and pop filter
Regular cleaning is crucial to maintain the audio quality and hygiene of your Joe Rogan Microphone. It is recommended to clean the microphone and pop filter after every use to remove any dust, debris, or moisture that may have accumulated.
To clean the microphone, gently wipe the body and the grille with a soft microfiber cloth. Be cautious not to apply excessive pressure, as it can damage the delicate components. For stubborn dirt or fingerprints, you can use a mild cleaning solution specifically designed for microphones. Ensure that the cleaning solution is safe to use on sensitive electronic equipment and follow the instructions provided by the manufacturer.
The pop filter, which is designed to reduce plosive sounds and protect the microphone from saliva and moisture, should also be cleaned regularly. Remove the pop filter from its holder and gently rinse it with lukewarm water. You can use a mild soap if necessary. Allow the pop filter to air dry completely before reattaching it to the microphone.
Storing the microphone properly
Proper storage is essential to protect your Joe Rogan Microphone from damage and ensure its longevity. When not in use, it is recommended to store the microphone in a clean and dry environment, away from direct sunlight and extreme temperatures.
Using a microphone stand or a dedicated microphone case is highly recommended to prevent accidental falls and protect the delicate components. Ensure that the microphone is securely placed in its stand or case, and any cables are properly coiled to avoid tangling or strain on the connectors.
Replacing worn-out parts or accessories
Over time, certain parts or accessories of your Joe Rogan Microphone may wear out or become damaged. It is important to regularly inspect your microphone and replace any worn-out parts to maintain its optimal performance.
The most common parts that may require replacement are the microphone cables, shock mounts, and windshields. If you notice any fraying or damage to the cables, it is advisable to replace them with high-quality cables that are compatible with your microphone model. Similarly, if the shock mount or windshield shows signs of wear or damage, it is recommended to replace them to ensure proper isolation and protection from unwanted vibrations and wind noise.
When replacing parts or accessories, always refer to the user manual or contact the manufacturer for guidance. They can provide you with the correct replacement parts and instructions on how to install them properly.
(*) Maintenance tips for Joe Rogan Microphone:
– Clean the microphone and pop filter after each use using a soft cloth or mild cleaning solution.
– Store the microphone in a clean and dry environment, away from direct sunlight and extreme temperatures.
– Use a microphone stand or dedicated microphone case for proper storage.
– Regularly inspect and replace worn-out parts such as cables, shock mounts, and windshields.
Comparing Joe Rogan Microphone to Other Brands
When it comes to choosing the perfect microphone for your recording needs, it’s essential to consider the different options available in the market. In this section, we will compare the Joe Rogan Microphone with other popular brands such as Audio Technica, Shure, and Rode. Each brand has its own unique features and advantages, so let’s dive in and find out which one is the best fit for you.
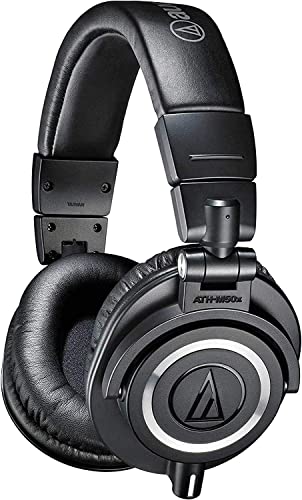
Audio Technica vs Joe Rogan Microphone
Audio Technica is a renowned brand known for its high-quality audio equipment. Their microphones are widely used by professionals in the music and broadcasting industry. However, when comparing Audio Technica to the Joe Rogan Microphone, there are some distinct differences worth considering.
One of the main advantages of the Joe Rogan Microphone over Audio Technica is its durability and long-lasting design. The Joe Rogan Microphone is built to withstand the rigors of daily use, making it a reliable choice for podcasters and content creators. Additionally, the Joe Rogan Microphone features noise-canceling technology, ensuring that you can record in any environment without unwanted background noise interfering with your audio.
On the other hand, Audio Technica microphones are known for their exceptional audio quality. They offer crystal clear recordings with precise detail, making them a preferred choice for professional recording studios. If you prioritize audio quality above all else, Audio Technica might be the better option for you.
Ultimately, the choice between the Joe Rogan Microphone and Audio Technica depends on your specific needs and preferences. If you value durability and noise-canceling technology, the Joe Rogan Microphone is an excellent choice. However, if you require top-notch audio quality for professional recordings, Audio Technica might be the better fit.
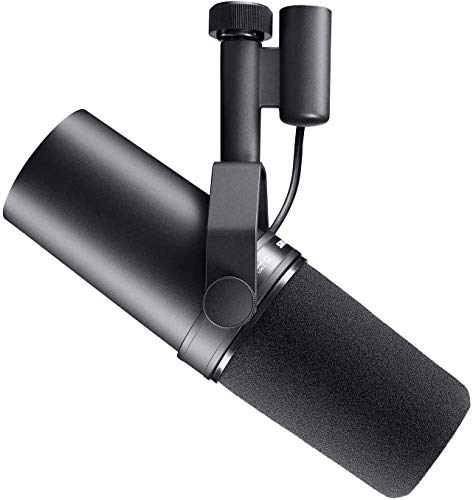
Shure vs Joe Rogan Microphone
Shure is another well-known brand that has established itself as a leader in the microphone industry. Their microphones are widely used by musicians and performers around the world. Let’s compare Shure to the Joe Rogan Microphone and see how they stack up against each other.
One of the key features of the Joe Rogan Microphone that sets it apart from Shure is its ease of use. The Joe Rogan Microphone is designed with simplicity in mind, allowing even beginners to set it up and start recording without any hassle. It offers plug-and-play functionality, making it a convenient choice for podcasters and solo content creators.
On the other hand, Shure microphones are known for their exceptional sound reproduction and clarity. They are often favored by professional musicians and live performers who require top-notch audio quality during their performances. Shure microphones offer a wide range of options, including handheld and wireless models, catering to different recording and performance scenarios.
When it comes to durability, both the Joe Rogan Microphone and Shure microphones are built to last. They can withstand the demands of regular use and provide reliable performance over time.
In summary, if you prioritize ease of use and convenience, the Joe Rogan Microphone is an excellent choice. However, if you require professional-grade audio quality and a wider range of options, Shure microphones might be the better fit for you.
Rode vs Joe Rogan Microphone
Rode is a brand that has gained popularity among content creators and vloggers due to its range of affordable and high-quality microphones. Let’s compare Rode to the Joe Rogan Microphone and see how they measure up against each other.
The Joe Rogan Microphone and Rode microphones both offer excellent audio recording capabilities. They are designed to capture clear and crisp audio, making them suitable for various recording scenarios. However, there are some differences worth noting.
One of the standout features of the Joe Rogan Microphone is its noise-canceling technology. This feature ensures that unwanted background noise is minimized, allowing for cleaner recordings. The Joe Rogan Microphone is particularly well-suited for podcasters and content creators who record in less controlled environments.
Rode microphones, on the other hand, are known for their versatility. They offer a wide range of options, including shotgun microphones and lavalier microphones, catering to different recording needs. Rode microphones are also highly regarded for their affordability, making them a popular choice among beginners and budget-conscious users.
When it comes to durability, both the Joe Rogan Microphone and Rode microphones are built to withstand regular use. They are made from high-quality materials that ensure longevity and reliability.
In this section, we have compared the Joe Rogan Microphone to other popular brands such as Audio Technica, Shure, and Rode. Each brand offers its own unique features and advantages. By considering your specific needs and preferences, you can make an informed decision and choose the microphone that best suits your recording requirements.
